
You’re putting in the laps. Showing up to practice. But your times aren’t dropping.
Here’s the thing—swimming harder won’t make you faster. Swimming smarter will.
That’s where drills come in. They’re the bridge between effort and actual speed gains, letting you isolate and fix the specific parts of your stroke that are holding you back. In Eastern European swim programs, coaches have long prioritized technical precision over just grinding out meters. The philosophy is simple: perfect the movement pattern first, then add speed.
This guide breaks down nine freestyle drills that actually work, with clear instructions you can take to the pool today.
How Proper Drills Make You Swim Faster
Think about learning to drive. Nobody hands you the keys and says “figure out steering, braking, mirrors, and traffic laws all at once.” You’d crash. Swimming works the same way.
When you swim full freestyle, your brain juggles dozens of variables simultaneously—arm entry, catch position, kick timing, rotation, breathing, head position. It’s too much to fix anything specific. Drills strip away the noise and let you focus on one element at a time.
Motor learning research shows that isolated practice builds skill faster than trying to improve everything at once. Your nervous system needs repetition of correct movement patterns to rewire itself. And here’s what matters most: technique learned through varied, focused drill work holds up under race pressure. Technique learned through mindless lap swimming falls apart when you’re tired and the clock is running.
Drills only work when you do them with intention. Going through the motions—just checking the drill box in your workout—wastes your time. Every rep needs a specific focus point. Quality beats quantity every single time.
9 Most Effective Freestyle Swimming Drills Every Swimmer Must Practice
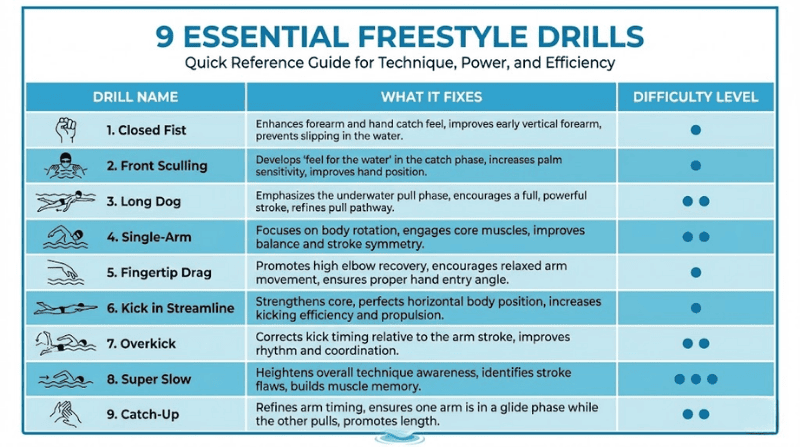
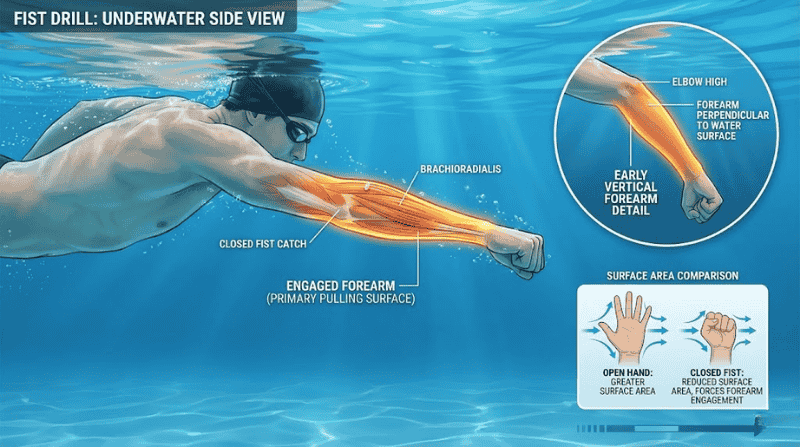
Drill #1: Closed Fist (Fist Drill)
What it fixes: Weak catch, over-reliance on hands, poor forearm engagement
Ball your hands into fists and swim normal freestyle. That’s it. Sounds too simple to work, but this drill forces a major shift in how you catch and pull.
Most swimmers pull with their palms and ignore their forearms entirely. When you remove your hands from the equation, your forearms have to do the work. You’ll develop what coaches call “early vertical forearm”—getting your forearm perpendicular to the surface sooner in the stroke to grab more water.
How to practice: Swim 25 meters with fists, then 25 meters regular. Do 4-6 rounds. You can also switch mid-length—12.5 meters fist, 12.5 meters open.
Watch out for: Dropping your elbows, tensing your shoulders, or rushing. Slow down and feel your forearms working.
The payoff: After swimming with fists, open your hands and they’ll feel like paddles. That sensation is your brain recognizing how much surface area you actually have to pull with.
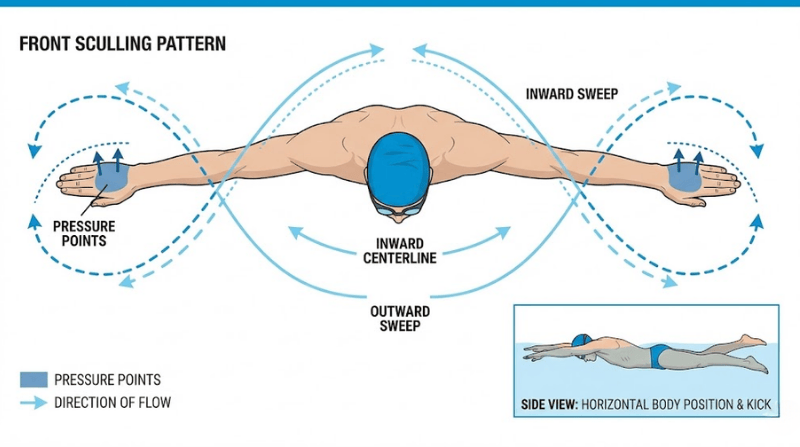
Drill #2: Front Sculling
What it fixes: Poor feel for water, sloppy hand positioning at the catch
Extend your arms in front of you and trace small figure-8 patterns with your hands, moving them in and out. Use a light freestyle kick to stay horizontal. You’re not trying to move forward much—just feeling pressure on your palms and learning what “catching” water actually means.
A snorkel helps here because you can keep your face down and focus entirely on your hands without worrying about breathing.
Progression tip: Start with a pull buoy between your legs for stability. Once you can maintain consistent pressure on your palms, ditch the buoy.
How to practice: 4×25 meters at a relaxed pace, concentrating on keeping constant pressure against the water throughout each figure-8.
Drill #3: Long Dog
What it fixes: Low elbow catch, weak pull phase, disconnected stroke rhythm
Swim freestyle but keep your arms underwater the entire time. No recovery over the water. Pull from full extension all the way to your hip, then sweep your arm back forward underwater to start the next stroke.
This drill is uncomfortable—and that’s the point. It forces you into a proper high-elbow catch position because you can’t cheat with momentum from your recovery. You’ll also build serious awareness of where your arm is throughout the pull.
How to practice: 6×50 meters, alternating 25 long dog with 25 fast regular freestyle. Feel how the catch position from the drill carries into your full stroke.
Drill #4: Single-Arm Freestyle
What it fixes: Poor body rotation, weak core connection, asymmetric stroke mechanics
Swim freestyle using only one arm while the other stays still. There are two versions:
Arm at your side: More challenging. Your non-working arm rests against your thigh. This version forces better rotation because you have less stability.

Arm extended forward: Easier balance, good for beginners. Your non-working arm stays stretched out in front.
Either way, the key is rotating your body to both sides even though only one arm is working. If you’re pulling with your right arm, you still need to rotate left when that arm enters the water.
How to practice: 4×50 meters—25 right arm only, 25 left arm only. Fins help you maintain body position while you’re learning.
Drill #5: Fingertip Drag
What it fixes: Tense recovery, low elbow during recovery, poor hand entry angle
During your recovery (when your arm is out of the water), drag your fingertips along the surface. Some coaches call this “zipper drill” because you can also trace your thumb up your side like you’re zipping a jacket.
This forces a high elbow recovery and relaxed shoulder. Your hand enters the water fingertips-first at the right angle instead of slapping down flat.
A note for sprinters: Many sprint freestylers use straight-arm recovery for power. If that’s your race stroke, this drill is less relevant for you. It’s best for middle-distance and distance swimmers working on efficiency.
How to practice: 4×50 meters with full focus on keeping your elbow as the highest point during recovery.
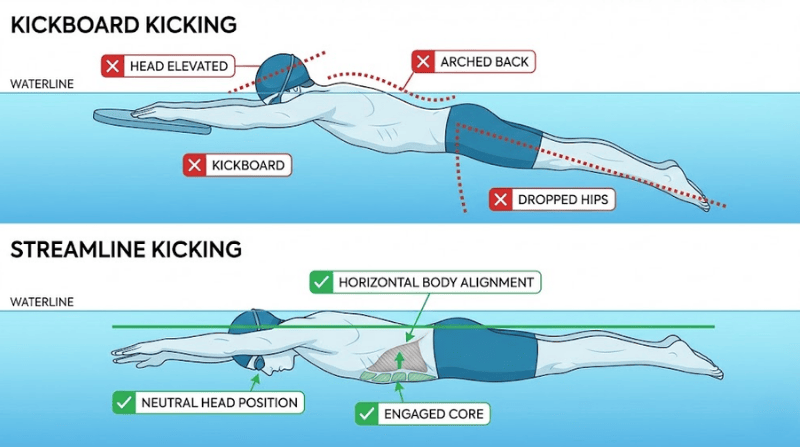
Drill #6: Kick in Streamline
What it fixes: Poor body position, lazy kick, core disengagement
Ditch the kickboard. Push off in streamline position—arms extended overhead, hands stacked, biceps squeezing your ears—and kick.
Kickboards actually teach bad habits. They let your hips drop and your back arch because the board holds your upper body up artificially. Streamline kicking forces you to engage your core and maintain the body position you’ll actually use when racing.
Variations: On your stomach, on your back, or rotating side to side (side-kick drill). A snorkel lets you kick continuously without breaking position to breathe.
How to practice: 8×25 meters, mixing stomach, back, and side positions. Keep your core tight and your head neutral.
Drill #7: Overkick Freestyle
What it fixes: Disconnected kick timing, scissors kick, dead legs during breathing
Kick at double your normal tempo while keeping your arm stroke at regular speed. Your legs should feel like they’re working harder than usual to drive each stroke.
This drill exposes timing problems. If your kick disconnects from your pull—or if your legs scissor apart when you breathe—you’ll feel it immediately. It also activates your legs for faster swimming, making it a good warm-up drill before sprint work.
How to practice: 4×50 meters during warm-up, focusing on continuous leg drive even through your breathing strokes.
Drill #8: Super Slow Swimming
What it fixes: Stroke blind spots, timing flaws, loss of feel for water
Swim as slowly as you physically can while maintaining perfect technique. Every part of your stroke gets full attention—entry, catch, pull, recovery, rotation, kick timing.
Ryan Lochte put it simply: “The only way to really work on technique is to swim very slowly.”
Why does this work? At slow speeds, you can’t hide anything. If your kick stops, you sink. If your catch slips, you feel it immediately. If your timing is off, the stroke falls apart. Super slow swimming builds body awareness that transfers directly to race pace.
How to practice: 4×100 meters at the slowest pace you can manage while keeping your stroke technically perfect. This is harder than it sounds.
Drill #9: Catch-Up Drill
What it fixes: Rushed arm timing, incomplete extension, overlapping strokes
One arm stays extended in front until your other arm completes its full stroke and “catches up”—your hands touch before the next stroke begins.
This drill separates your strokes so you can focus on each one individually. It’s particularly good for swimmers who rush their turnover and never fully extend.
A word of caution: Don’t overuse catch-up drill. Too much practice creates an unnaturally slow, choppy stroke rhythm that’s hard to unlearn. Use it sparingly for specific timing work.
Better alternative: Try 3/4 catch-up, where you start your next stroke when your recovering hand reaches your shoulder instead of waiting for full extension. This is closer to actual race timing.
How to practice: 4×25 meters, then move on. This drill works best in small doses.
How to Progress Your Drills: The 3-Stage Model
Most swimmers do drills without any progression plan.
They run through the same routine week after week, and nothing changes.

Here’s a better approach borrowed from motor learning research.
Stage 1: Isolated Practice
Drill only, slow speed, with equipment support. Use fins, a snorkel, or a pull buoy to remove variables so you can focus purely on the skill you’re building. This is where the initial learning happens.
Stage 2: Integrated Practice
Alternate drill with regular swimming. Swim 25 meters of drill, then 25 meters of regular freestyle, feeling for the technique change. Start removing equipment. This stage connects the drill skill to your actual stroke.
Stage 3: Transfer Under Pressure
Incorporate the drill into faster swimming, race-pace sets, and fatigued conditions. If the technique holds when you’re tired and pushing hard, you’ve actually learned it.
Example Progression for Fist Drill:
Weeks 1-2: 4×50 fist drill with fins, focusing on forearm feel. Weeks 3-4: 8×25 alternating fist and regular swim, no fins. Weeks 5+: Insert 25 fist into 200s at race pace to reinforce the catch.
Timeline expectations: You’ll notice feel changes within 2-3 weeks. Lasting technique changes that show up in races take 6-8 weeks of consistent, progressive practice.
Common Swimming Drill Mistakes That Waste Your Time
Going too fast. Drills aren’t mini-races. Speed defeats the entire purpose of isolated practice. Slow down.
No specific focus. Swimming through drills on autopilot teaches nothing. Every rep needs a clear intention—what exactly are you trying to feel or fix?
Never integrating. If you do drills in warm-up and then forget about them during your main set, the skill won’t transfer. Connect drill work to real swimming.
Overusing one drill. Your body adapts. Doing the same drill every practice hits diminishing returns fast. Rotate through different drills targeting different skills.
Skipping the transfer stage. A drill you can do perfectly at slow speed is worthless if it disappears when you race. Practice under pressure.
Wrong drill for your problem. Fingertip drag won’t fix your kick. Fist drill won’t fix your rotation. Match the drill to your actual weakness—or ask a coach to help identify what needs work.
Drill Modifications by Swimmer Level
| Level | Best Drills | Equipment | Focus |
|---|---|---|---|
| Beginners | Catch-up, Fingertip drag, Kick in streamline | Fins, pull buoy, snorkel (all optional) | Body position, basic timing |
| Intermediate | Fist drill, Single-arm, Sculling, Over kick | Snorkel optional, fins for specific drills | Feel for water, rotation, kick connection |
| Competitive | All drills, Long dog, Super slow | Minimal—technique should hold without aids | Refinement, power application, race transfer |
| Masters (30+) | Super slow, Sculling, Single-arm, Fingertip | Fins and pull buoy for shoulder protection | Efficiency, injury prevention, technique maintenance |
For masters swimmers especially, drills serve a dual purpose: improving technique and protecting joints. Lower-impact drills like sculling and super slow swimming let you work on skill without the shoulder stress of high-volume training.
Equipment That Makes Drills More Effective
Snorkel: Removes breathing from the equation so you can focus entirely on technique. Best for sculling, kick drills, and single-arm work. Worth the investment.
Fins: Help maintain body position while you’re learning a new skill. Short fins work better than long fins for most drills—they provide assistance without changing your kick mechanics too much. Remove them once your technique is solid.
Pull Buoy: Supports your legs during arm-focused drills. Use sparingly. Becoming dependent on a pull buoy masks kick and rotation problems.
Paddles: For advanced swimmers only. They amplify everything—including bad habits. If your catch isn’t solid, paddles will reinforce the wrong movement pattern. Get your technique right first.
Conclusion
Drills work when you do them with purpose and progress them over time. Pick 2-3 drills that target your specific weaknesses, follow the 3-stage model, and be patient. Technique development isn’t instant, but it pays off in faster, more efficient swimming that lasts.
At Rocket Swim Club, drill-based technique development is central to our training approach. Our coaches use Sportecos technology to track how technical improvements translate into actual speed gains, so you can see your progress in real numbers. If you’re looking for structured coaching that prioritizes swimming smarter—not just harder.
Explore our competitive and adult programs to find the right fit.
Frequently Asked Questions
How often should I do freestyle drills?
Two to three times per week works for most swimmers. You can incorporate them into warm-up or dedicate a specific portion of practice to drill work. Consistency matters more than volume.
How long before I see improvement from drills?
Initial feel changes happen within 2-3 weeks—you’ll notice the water differently. Lasting technique changes that affect your times take 6-8 weeks of consistent practice with proper progression.
Can beginners do these drills?
Yes, with modifications. Start with catch-up, fingertip drag, and kick in streamline. Use fins and a snorkel for support until the movements feel natural.
Which drill is best for fixing a dropped elbow?
Fist drill and front sculling. Both build the awareness and strength needed for a high-elbow catch. Long dog also helps by forcing proper catch position.
Should competitive swimmers still do drills?
Absolutely. Elite swimmers use drills to maintain feel for water and prevent technique drift over long seasons. Even Olympians do drill work regularly.