
You’ve watched someone swim breaststroke and it looked smooth, almost lazy. Then you tried it—and your hips sank, your timing felt off, and you were out of breath in half a lap. That’s normal.
Breaststroke is the stroke most people attempt first, but it’s also the one most people do wrong. It looks easy from the pool deck. In reality, breaststroke has more moving parts than most swimmers realize. Your arms recover underwater (the only stroke where this happens), the kick uses a motion completely different from freestyle or backstroke, and the timing between your pull, breath, kick, and glide has to be right or you’re fighting the water instead of moving through it.
This guide breaks down every phase: body position, arm pull, kick, breathing, and coordination. You’ll also get the mistakes that stall most beginners, practice drills you can take to the pool today, and a section on protecting your knees that most instruction skips entirely.
At Rocket Swim Club in Toronto, our coaches Alina and Ivan, both former members of Moldova’s National Swim Team, have spent over a decade teaching this stroke to beginners across the Greater Toronto Area. What you’ll read here comes directly from what works on deck.
Why Is Breaststroke Different from Other Strokes?
Breaststroke is a short-axis stroke. Your body pivots around your hips, moving up and down, rather than rotating side to side the way it does in freestyle or backstroke. This hip-driven motion shapes everything: how you kick, how you breathe, and how you time the whole stroke.
- It’s the only competitive stroke where your arms recover underwater. In freestyle, backstroke, and butterfly, the arms come over or around above the surface. In breaststroke, you push your hands forward through the water after each pull. That underwater recovery creates more resistance than any other stroke, and it’s the main reason breaststroke is the slowest of the four.
- Body position matters a lot here because every bit of extra drag costs you.
- The kick is completely different too. Every other stroke uses some version of a flutter or dolphin kick with pointed toes and legs close together. Breaststroke uses a whip kick, feet flexed outward, legs sweeping apart before snapping back together. Nothing else in swimming feels quite like it, and it’s the piece that takes beginners the longest to get comfortable with.
- Breaststroke does have one thing going for beginners: you breathe with your head above the water. But proper technique means putting your face down in between breaths. The glide phase—a built-in pause in streamline after the kick—rewards patience over power. For a newer swimmer, that’s actually an advantage once you stop rushing.
How to Make Your Body Position Right in Breaststroke
- Start in streamline: arms stretched forward with hands together, legs extended and squeezed behind you, toes pointed. This is where every stroke cycle begins and ends. The flatter and more horizontal you stay, the less water you’re pushing out of your way.
- Keep your hips near the surface: When they sink, your legs hang below you like anchors and every stroke feels twice as hard.
- The fix is almost always your head. If you’re staring straight ahead, your hips will drop. Look down at about a 45-degree angle, chin slightly tucked. Think about sliding through a narrow tunnel rather than bobbing up and down.

- Head position is the single biggest lever you have over body alignment in breaststroke. Coaches at Rocket Swim Club see it with nearly every new swimmer who comes in for a tryout—they lift their chin, their hips drop, and they can’t figure out why they’re exhausted after two laps.
- Tuck the chin, press the chest down slightly, and the hips rise. It’s that direct.
- Self-check: If your feet keep breaking the surface behind you or your thighs feel vertical, your hips are too low. Press your chest down slightly to bring them up. You should feel water along the front of your thighs, not the bottom of them.
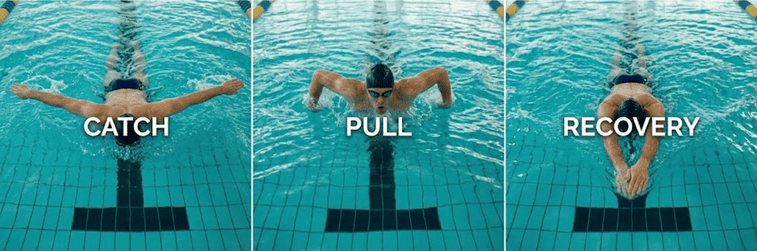
The Arm Pull: Catch, Pull, and Recovery in Breaststroke
The Catch (Starting the Stroke)
- From streamline, rotate your thumbs down slightly so your palms face outward.
- Sweep your hands apart, just past shoulder width, no wider.
- Keep your arms fairly straight during this phase. You’re not generating power yet—just positioning your arms to press against a wider surface of water in the next phase.
The Pull (Where You Generate Power)
- Bend at the elbows and keep them high. The coaching cue is “elbows above hands.”
- Pull your hands back toward your chin and chest—think of scooping water toward you rather than pushing it down.
- This is when your head naturally rises and you take your breath.
- The pull is shorter than most beginners expect. Your hands should never travel behind your chest line.
The Recovery (Getting Back to Streamline)
- Bring your hands together in front of your chest, fingertips pointing forward.
- Shoot your arms forward into streamline as your head drops back into the water. This needs to be quick.
- Push your hands forward, not down.
Self-check: If your arms are pulling past your shoulders, you’ve gone too far. A common sign of over-pulling: you feel strong but aren’t actually going anywhere. Keep the pull compact, always in front of your body.
Breaststroke Kick
The Four-Part Kick Sequence
- UP: Draw your heels up toward your backside by bending your knees. Keep knees roughly shoulder-width apart, don’t let them splay wide.
- OUT: Flex your feet so toes point toward your shins, then turn them outward. Soles need to face the water behind you.
- AROUND: Sweep your legs backward and outward in a circular whipping motion, pressing the soles of your feet against the water.
- TOGETHER: Snap your legs together into a straight, streamlined position with toes pointed. This final snap is where most of your propulsion happens. Don’t rush past it.
Why the Kick Matters More Than You Think
- In breaststroke, the kick generates the majority of forward movement, far more than your arms.
- A weak or sloppy kick is usually the main reason beginners feel like they’re churning but going nowhere.
How to Protect Your Knees While Learning
- The breaststroke kick puts lateral stress on the inside of your knee (medial collateral ligament, MCL).
- Keep your kick narrower rather than wider.
- If you feel any pinching or aching, stop and check your foot position. Feet should turn out, not knees.
- Work on hip and glute strength outside the pool (clamshell exercises, lateral band walks, single-leg glute bridges).
Self-check: If you don’t feel the water pushing against the soles of your feet during the sweep, your feet probably aren’t flexed and turned out enough.
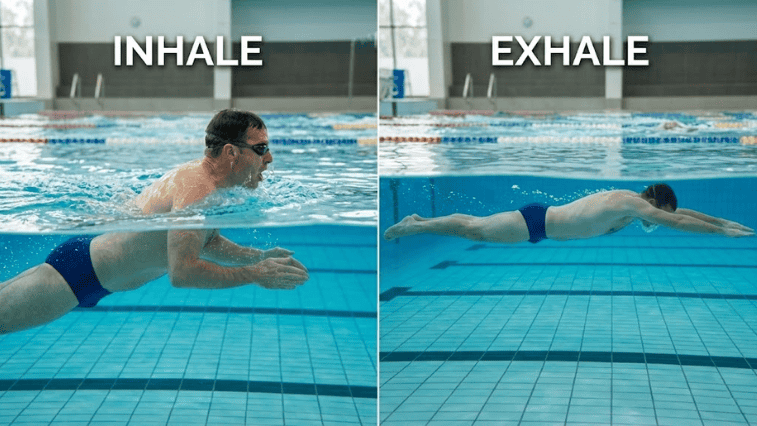
Breaststroke Breathing: When to Breathe and How to Keep It Smooth
- Inhale: Through your mouth as your arms pull back. Let the stroke bring you to the surface.
- Exhale: Through nose or mouth while your face is in the water during the glide. Don’t hold your breath.
- Chin position: Keep it tucked. Mental image: pretend there’s a tennis ball under your chin.
Self-check: If you’re gasping for air every time your head comes up, you’re probably not exhaling enough underwater.
Putting It All Together: Pull, Breathe, Kick, Glide
- Pull — Sweep arms outward and back to generate momentum and lift your upper body.
- Breathe — Take a quick breath as your arms finish the pull.
- Kick — As your arms shoot forward into streamline, fire the kick.
- Glide — Hold streamline and let the kick carry you forward before starting the next stroke.
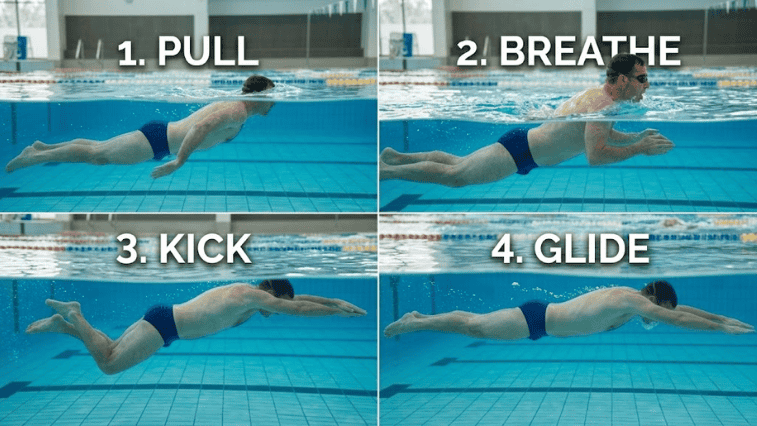
Common timing error: Doing everything at once. Think of it as a relay—the arms go first, then hand off to the legs. Hold the glide for a full count of two when learning.
Common Mistakes That Slow Beginners Down
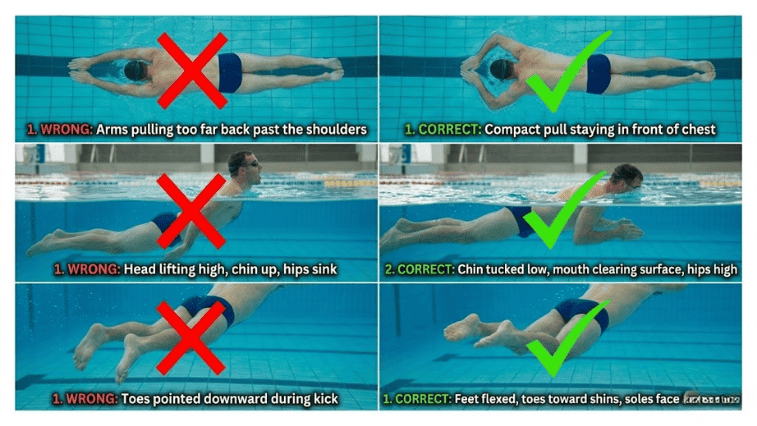
- Pulling Arms Too Far Back: Hands should never go behind the chest.
- Lifting Your Head Too High to Breathe: Sinking hips = more drag.
- Kicking with Knees Too Wide: Keep knees roughly shoulder-width.
- Skipping the Glide: Pausing is where efficiency comes from.
- Arms and Legs Moving at the Same Time: Pull first, then kick.
- Pointing Toes During the Kick: Flex toes toward shins, soles against water.
Breaststroke Practice Drills You Can Do at the Pool
- Kickboard Kick Drill: Isolate the kick with a kickboard.
- Arms-Only with Flutter Kick: Focus on arm pull and breathing rhythm.
- Glide Counting: Count 2–3 seconds during glide to find rhythm.
- 2-Kick, 1-Pull: Two kicks per pull to reinforce glide and timing.
Equipment That Helps You Learn Breaststroke Faster
- Kickboard: $15–25 CAD
- Pull buoy: $15–25 CAD
- Goggles: $20–90 CAD
What to skip for now: Fins (interfere with whip kick), hand paddles (add shoulder stress).
Ready to Work on Your Breaststroke with an Expert Coach?
Reading about technique gives you knowledge. Practicing with a coach gives you skill. Rocket Swim Club offers lessons for beginners in Toronto, private swimming lessons, and programs for adults, kids, and families. Coaches bring national team backgrounds and over 10 years of experience teaching swimmers at every stage.