
You’ve probably heard a lot of catch and pull advice that sounds like it came from a physics textbook. Right?
For example,
“Establish an early vertical forearm.”
“Maximize your propulsive surface area.”
“Maintain optimal forearm angle throughout the pull phase.”
And you’ve probably thought: What does any of that actually mean when I’m in the water?
If this is your concern then this guide is for you.
Your catch and pull don’t have to be complicated.
The best swimmers in the world aren’t thinking about physics equations while they swim. They’ve just practiced a few simple things until they became automatic.
Think of it like pulling yourself along a rope in the water. Your arm grabs, then pulls. That’s really all we’re talking about here. The rest is just learning how to grab and pull more effectively.
Let’s dive in……
What the Catch and Pull Actually Do In Swimming?
Before we get into technique, you need to understand why this matters so much.
The catch is how your hand “grabs” the water after it enters. The pull is how you move that water backward to push yourself forward. Together, they create most of your forward motion—somewhere around 80% or more of your propulsion.
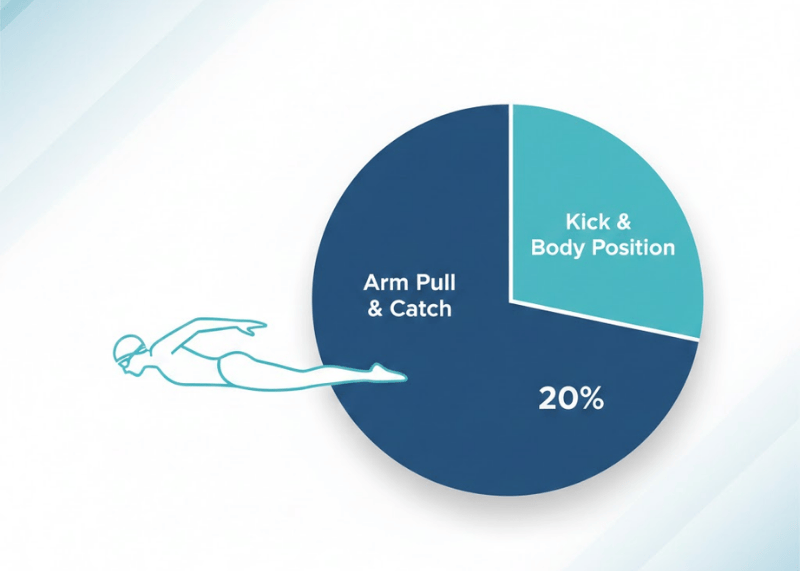
Your kick? It does less than most people think. It’s mostly there for balance and body position. The real engine of swimming is your arms.
Here’s an analogy that helps: imagine you’re climbing a rope ladder. You need something solid to push against. Water isn’t solid, but it’s dense enough that if you position your arm correctly, it acts like something you can grab onto and pull past.
The swimmer who “grabs” more water with each stroke travels farther with less effort. And that’s exactly what good catch and pull technique gives you.
Three Parts of a Good Catch
The catch happens fast—maybe a second or less—but it has three distinct phases.

Miss any of them and you lose power before your pull even starts.
Hand Entry
Your hand should enter the water in front of your shoulder. Not across your body toward the center line. Not way out to the side like you’re doing a snow angel. Right in front of your shoulder.
Fingertips go in first, angled slightly down. Think of sliding your hand through a mail slot—smooth, fingers leading, no slapping or splashing.
The most common mistake here is entering thumb-first with your hand rotated. This sets up everything that follows for failure. Another common error is slapping the water flat with your palm, which creates drag and disrupts your rhythm.
Reach
After your hand enters, you need to extend forward. This is where a lot of swimmers mess up because they’re in a hurry to start pulling.
Extend your arm after entry. You’re making yourself longer, reaching toward the far wall. Keep your palm pointing down toward the pool bottom, not up toward the surface.
This reach sets up your catch. Skip it or rush through it, and you’re pulling from a weak position with a smaller “paddle.” Give yourself that extra split second of extension.
High Elbow
This is the part that confuses everyone. Coaches talk about “high elbow catch” or “early vertical forearm” like you’re supposed to know what that feels like.
Here’s the simple version: after you reach, bend at the elbow while keeping the elbow near the surface. Your fingertips should point toward the pool bottom. Your forearm rotates to face backward.
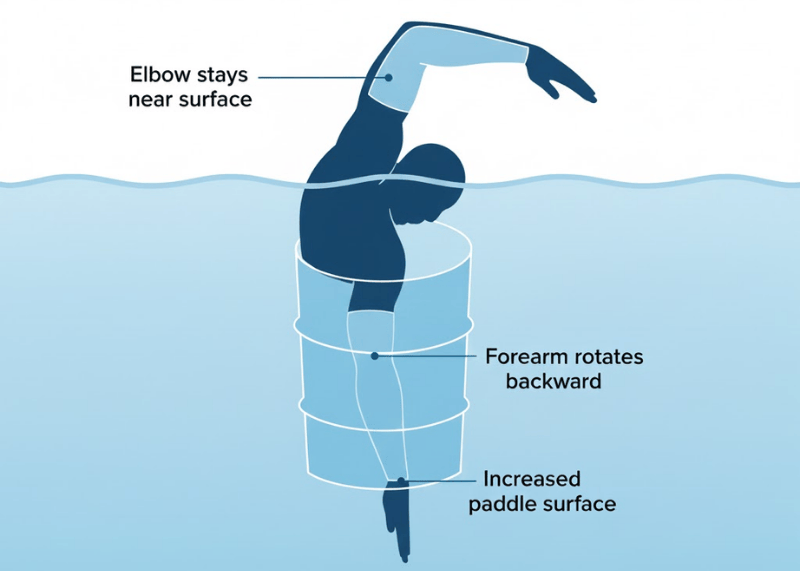
When you do this right, your forearm becomes part of your paddle—not just your hand. You’re grabbing more water because you’re using more surface area.
A simple test: if your elbow drops below your hand before your pull starts, you’re losing power. The elbow stays high (near the surface) while the hand and forearm drop down and face backward.
Imagine you’re reaching over a barrel and trying to pull it toward you. Your elbow stays up and over while your forearm wraps around. That’s the feeling you’re after.
Make Every Pull Count
Once your arm is positioned with that high elbow, you’re ready for the power phase. This is where speed comes from.
The goal is simple: push water toward your feet, not toward the pool bottom. A lot of swimmers push down when they should be pushing back. If you’re pushing down, you’re lifting yourself up instead of moving yourself forward.
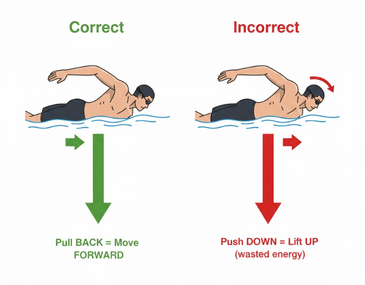
Keep your hand and forearm facing backward for as long as possible through the pull. That surface area you created during the catch? Maintain it. The moment your hand starts slipping or your elbow collapses, you lose grip on the water.
Finish past your hip. Don’t cut the pull short at your belly button—that’s leaving free propulsion on the table. Your hand should exit the water somewhere around your upper thigh.
Here’s something most people get wrong: they pull hardest at the beginning and ease off at the end. That’s backwards.
Start the catch slow, finish the pull fast. Accelerate through the stroke. The catch is about positioning; the pull is about power. When you try to muscle through the catch, you usually just collapse your elbow and slip through the water.
Picture a ladder painted on the pool bottom, running parallel to your lane. Each stroke, you’re pulling yourself past one step, then another. Step by step, you move down the pool.
Five Effective catch and pull drills That Actually Help Swimmers
There are dozens of catch and pull drills out there. Most swimmers don’t need dozens. They need a handful they can actually remember and use. Here are five that work.
1. Catch-Up Drill
This is the classic for a reason. It forces you to feel each phase of the stroke separately instead of rushing through.
How to do it: Keep one arm extended in front of you while the other arm completes a full stroke—entry, catch, pull, recovery, everything. Your recovering hand “catches up” to your extended hand before the extended arm starts its stroke.
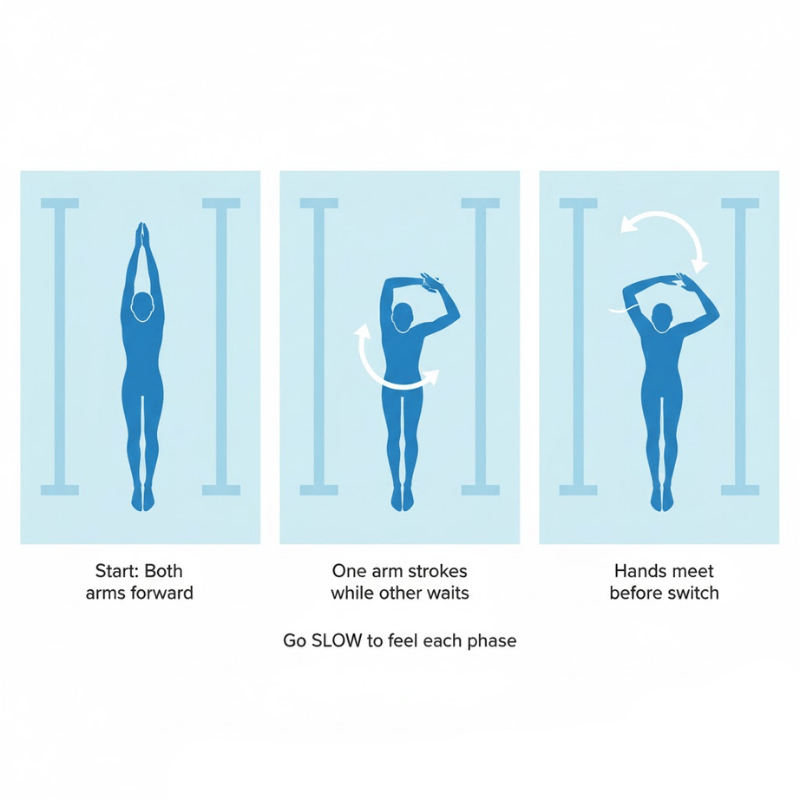
Why it works: Slowing everything down lets you focus on your catch position without worrying about timing. You can actually feel whether your elbow is high, whether your hand is pointing down, whether you’re reaching fully.
Rocket Swim tip: Go slow. Speed defeats the purpose of this drill. If you’re racing through catch-up, you’re missing the point entirely.
2. Fist Swimming
This one sounds weird but works incredibly well.
How to do it: Swim normal freestyle but close your hands into fists. Yes, it feels awkward. Yes, you’ll go slower. That’s the point.
Why it works: With your hands closed, your forearm has to do more work. You’ll start to feel water pressure on your forearm in a way you never noticed before. When you open your hands again, you’ll have much better awareness of your whole arm as a paddle—not just your palm.
3. Single-Arm Freestyle
This drill isolates one arm so you can focus completely on your catch and pull mechanics.
How to do it: Swim freestyle using only one arm. Your non-working arm stays extended at your side. Breathe to the side of your non-working arm.
Why it works: You can’t hide a bad catch when only one arm is working. Every flaw becomes obvious. It also helps you feel the connection between your catch, your body rotation, and your pull.
4. Fingertip Drag
This one improves your recovery and helps you feel a relaxed, high-elbow recovery that sets up a clean entry.
How to do it: During the recovery phase (when your arm is out of the water), drag your fingertips along the surface of the water. Your elbow should be high, with your hand hanging relaxed below it.
Why it works: It forces you to keep your elbow high during recovery, which typically leads to a better hand entry position. If your recovery is too flat or too wide, you won’t be able to drag your fingertips effectively.
5. Sculling
Sculling teaches you to feel water pressure—what it’s like to have a “grip” on the water versus slipping through it.
How to do it: Float face-down with your arms extended in front of you. Move your hands in small figure-eight or sweeping motions, palms facing mostly down. You should be able to hold your position or even move forward slowly without kicking. Keep your movements small—this is about feeling the water, not thrashing around.
Why it works: Sculling builds your sensitivity to water pressure. Once you know what “holding” the water feels like, you can recognize when you’re losing that grip during your actual stroke.
Common Catch and Pull Problems swimmers Face so Often (And How to Fix Them)
Even knowing the right technique, things go wrong. Here’s how to troubleshoot.
If your shoulders get tired fast, you might be pulling straight down instead of back. When you push down, your shoulder does extra work lifting you up against gravity. Shift your focus to pushing water toward your feet, past your hip. The cue “back, not down” can help.
If you feel like you’re working hard but going nowhere, check your elbow. Nine times out of ten, it’s dropping early. An elbow that drops below your hand during the catch means you’ve lost your paddle position—you’re just pushing water down with your palm instead of pulling it back with your whole forearm.
Try the fist drill for a few laps. When you open your hands, pay attention to whether you can feel pressure on your forearm, not just your palm.
If you get a “dead spot” in your stroke—a moment where you’re not moving forward—you’re probably not reaching far enough before starting your catch, or you’re cutting your pull short before your hand reaches your hip. Film yourself or ask someone to watch. The fix is usually just giving yourself permission to extend fully at both ends of the stroke.
Try This to improve catch and pull in Your Next Swim
Don’t try to fix everything at once. Pick one thing and focus on it.
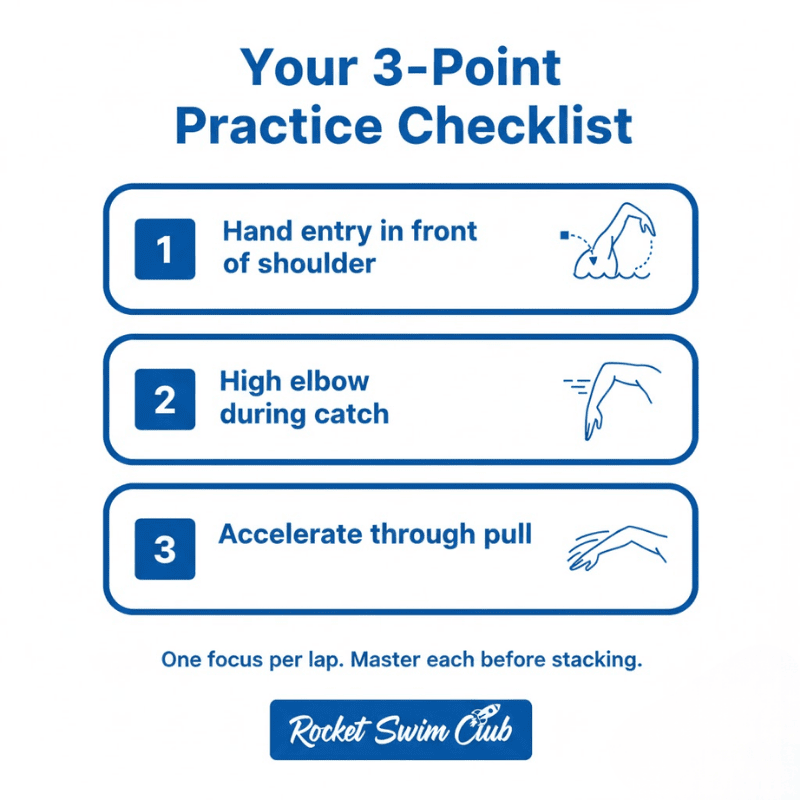
Your three-point checklist:
- Hand entry in front of your shoulder, fingertips first, angled down
- High elbow during the catch—fingertips point to the bottom while elbow stays near the surface
- Accelerate through the pull—slow catch, fast finish, hand exits past your hip
One focus per lap. Swim four to six laps thinking only about hand entry. Then four to six laps thinking only about your high elbow catch. Then four to six laps accelerate through your pull. Don’t try to stack all three until each one starts feeling more natural on its own.
At Rocket Swim Club, our coaches break technique down just like this—in real time, during your session. If you’re in Toronto and want hands-on feedback on your catch and pull, come see how we teach swimmers of all levels.
The Bottom Line
Good catch and pull technique isn’t about perfection. Olympic swimmers are still tweaking their strokes. It’s about small improvements that add up over time. Here’s a three point effective checklist that you can practice to get better.
The catch sets it up. The pull powers you forward. Get those two things working together, and everything about your freestyle gets easier—you go faster with less effort, you get less tired, and swimming actually starts to feel good.
And really, that’s the whole point.
Looking for a better guidance to improve your swimming?
Visit Rocket swim Club in the greater Toronto area, our expert coaches will help you to do that.