
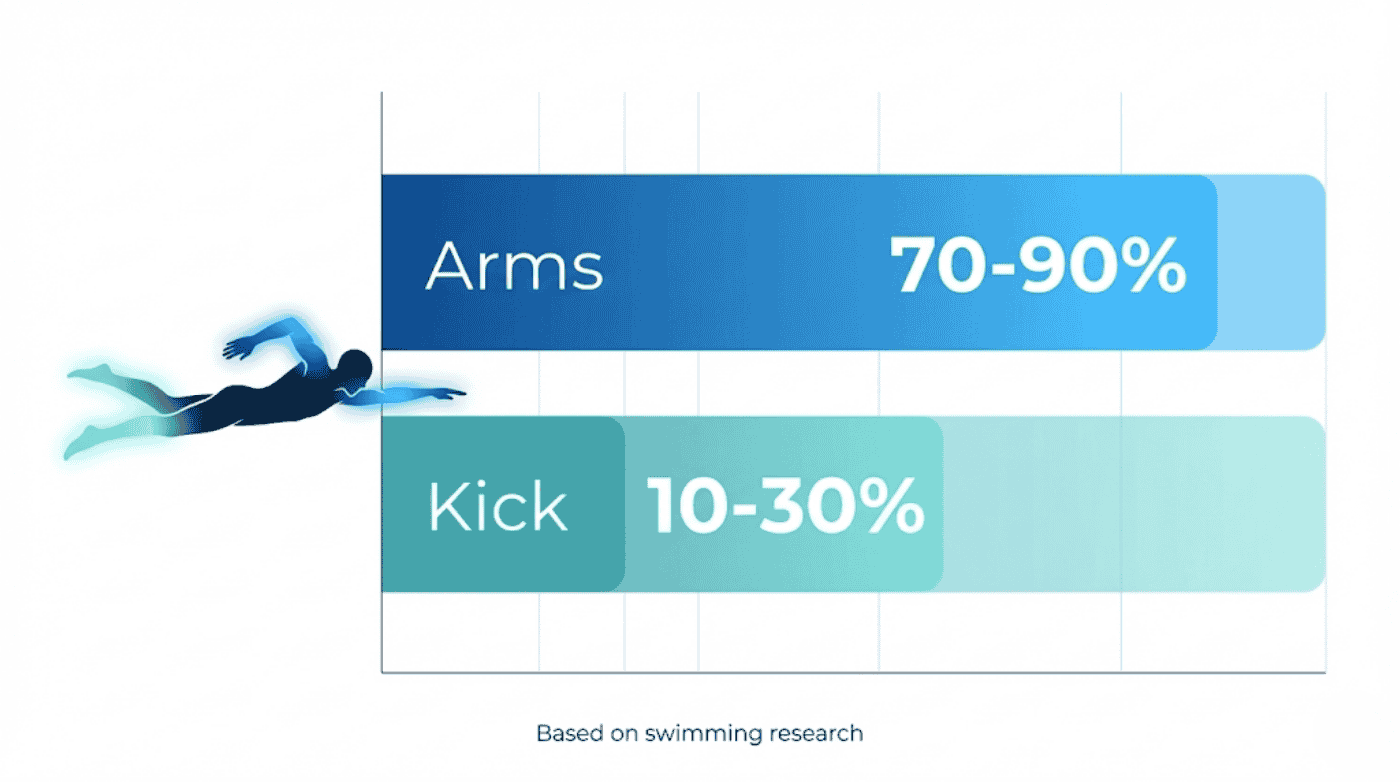
Your arms do most of the work in freestyle—around 70-90% of your propulsion.
The kick contributes far less than most swimmers assume. Yet swimmers often treat the arm stroke like one big windmill motion. Spin faster, swim faster. Right?
Not quite.
The freestyle arm stroke breaks down into four connected movements: entry, catch, pull, and recovery. Each phase has a job. Miss any one of them, and you’re leaving speed on the table.
The four arm movements of freestyle swimming are:
- Entry– Hand enters water in front of shoulder
- Catch– Forearm drop to ‘grab’ the water
- Pull– Arm pushes water backward past the hip
- Recovery– Arm swings forward above water to restart

Why Your Arm Technique Matters More Than Your Kick in Freestyle
Swimming research shows that arms generate 70-90% of forward motion in freestyle.
But Freestyle kick?
Maybe 10-30%.
Each phase depends on the one before it.
A sloppy entry sets up a weak catch. A dropped elbow during catch means less power in your pull. Think of it like a chain reaction—fix one link, and everything downstream improves.
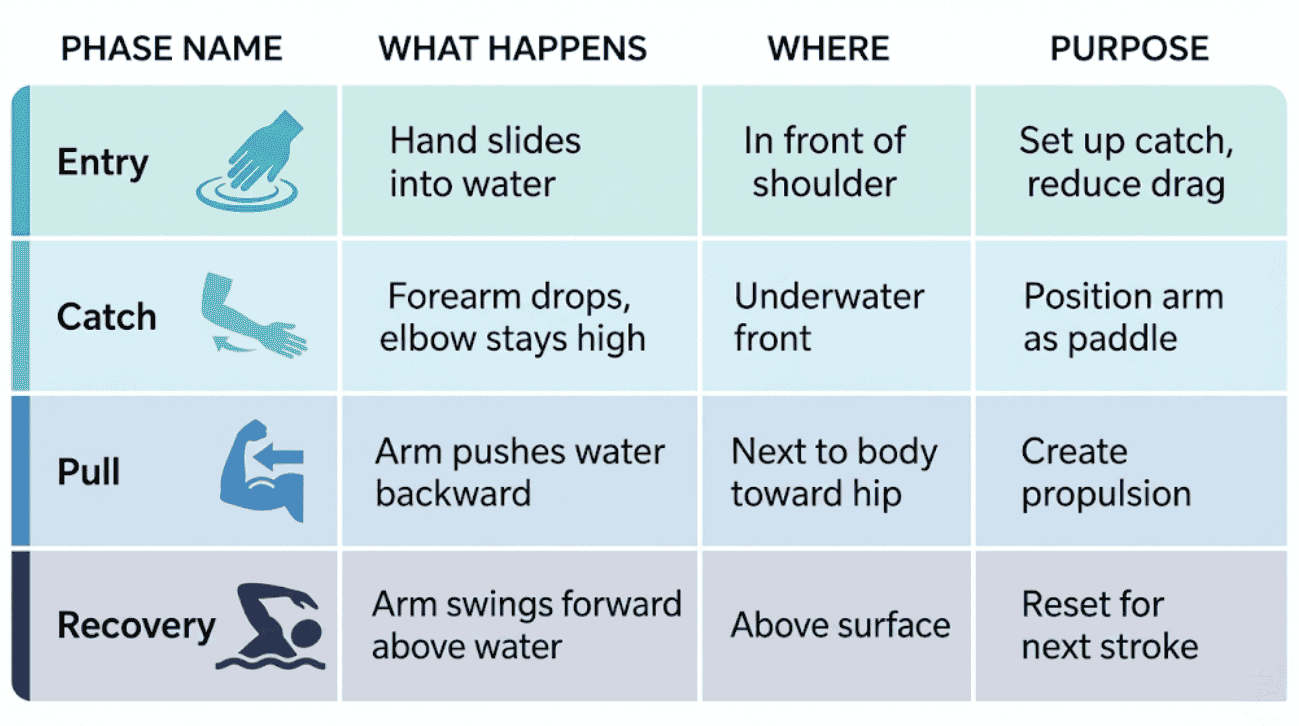
| Phase | What Happens | Where | Purpose |
| Entry | Hand slides into water, arm extends | In front of shoulder | Set up catch, reduce drag |
| Catch | Forearm drops down, elbow stays high | Underwater, front | Position arm as “paddle” |
| Pull | Arm pushes water backward | Next to body underwater, toward hip | Create propulsion |
| Recovery | Arm swings forward above water | Above surface | Reset for next stroke |
Phase 1: The Entry
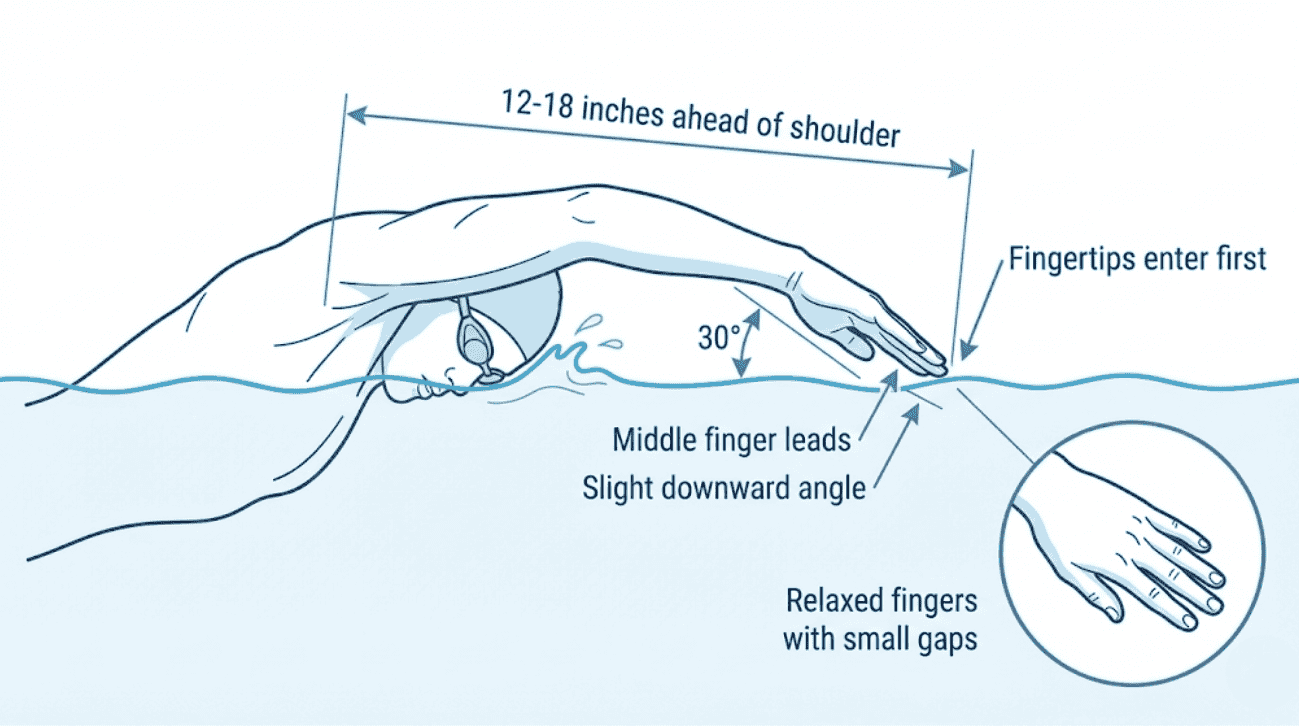
Your hand should enter about 12-18 inches in front of your shoulder. Not directly in front of your nose. Not way out wide. Roughly shoulder width.
The sequence: fingertips first, then wrist, then elbow. Middle finger leads, slicing into the water with minimal splash. Keep your hand relatively flat, angled down slightly. Fingers should be relaxed with small gaps between them. A slightly spread hand actually catches more water than a stiff, pressed-together one.
Common Entry Mistakes:
- Crossing over midline– Creates snake-like wiggle that wastes energy
- Slapping the water– Enter fingertips first, not palm-flat
- Thumb-first entry– Causes shoulder problems; middle finger leads
- Over-reaching– Shortens effective stroke; enter 12-18 inches ahead
Self-Check:
☐ Hand enters without loud splash
☐ Fingertips enter before palm
☐ Hand enters in line with shoulder (not crossing center)
☐ Fingers relaxed, not pressed tightly together
Common Questions Related To Entry
Should my thumb or fingers enter first? Your middle finger should lead. Thumb-first entry internally rotates the shoulder and can cause impingement over time.
How far ahead should my hand enter? About 12-18 inches in front of your shoulder. Too close creates choppy strokes. Too far puts your arm in a weak position.
Why does my coach say I’m crossing over? Your hand enters toward your body’s midline instead of in line with your shoulder. Usually sneaks in when tired or breathing.
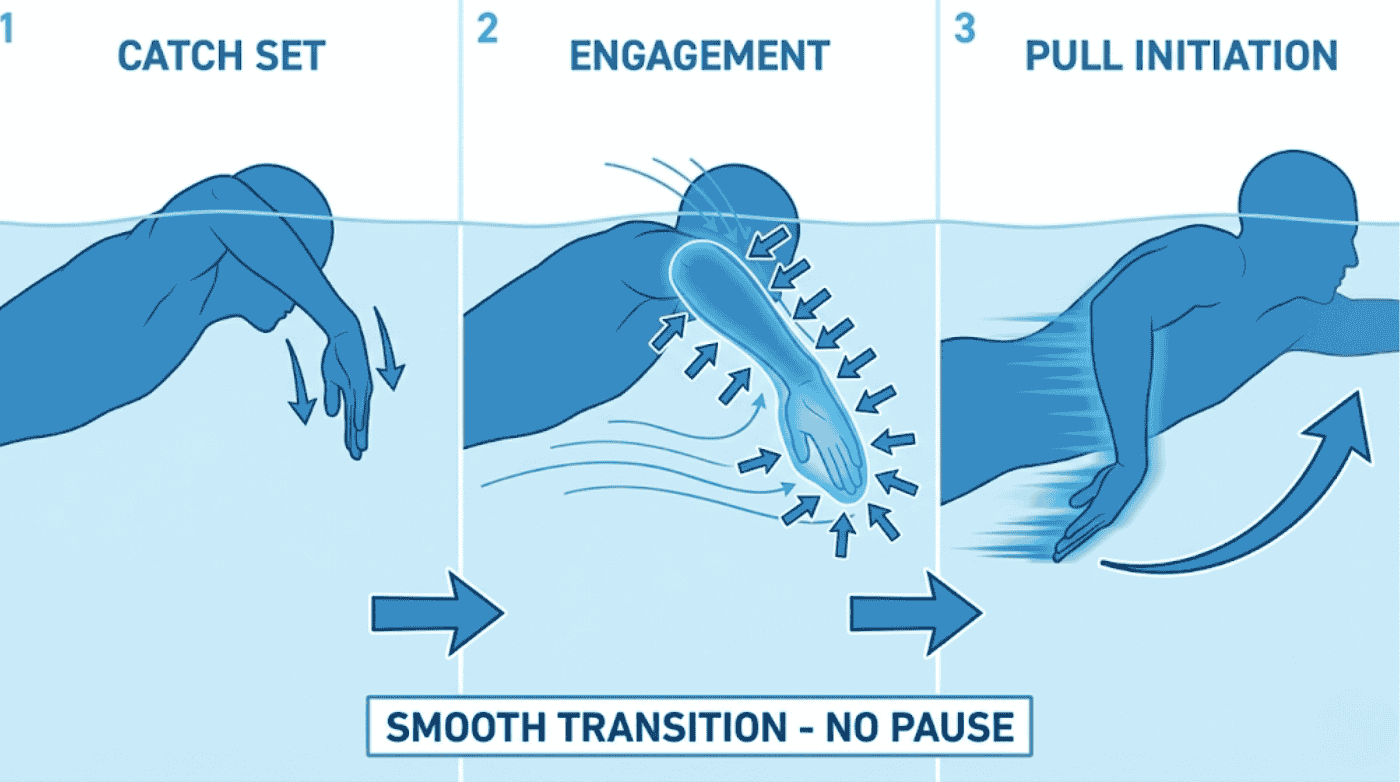
Phase 2: The Catch
The catch is where most swimmers lose their stroke. It’s subtle and hard to feel.
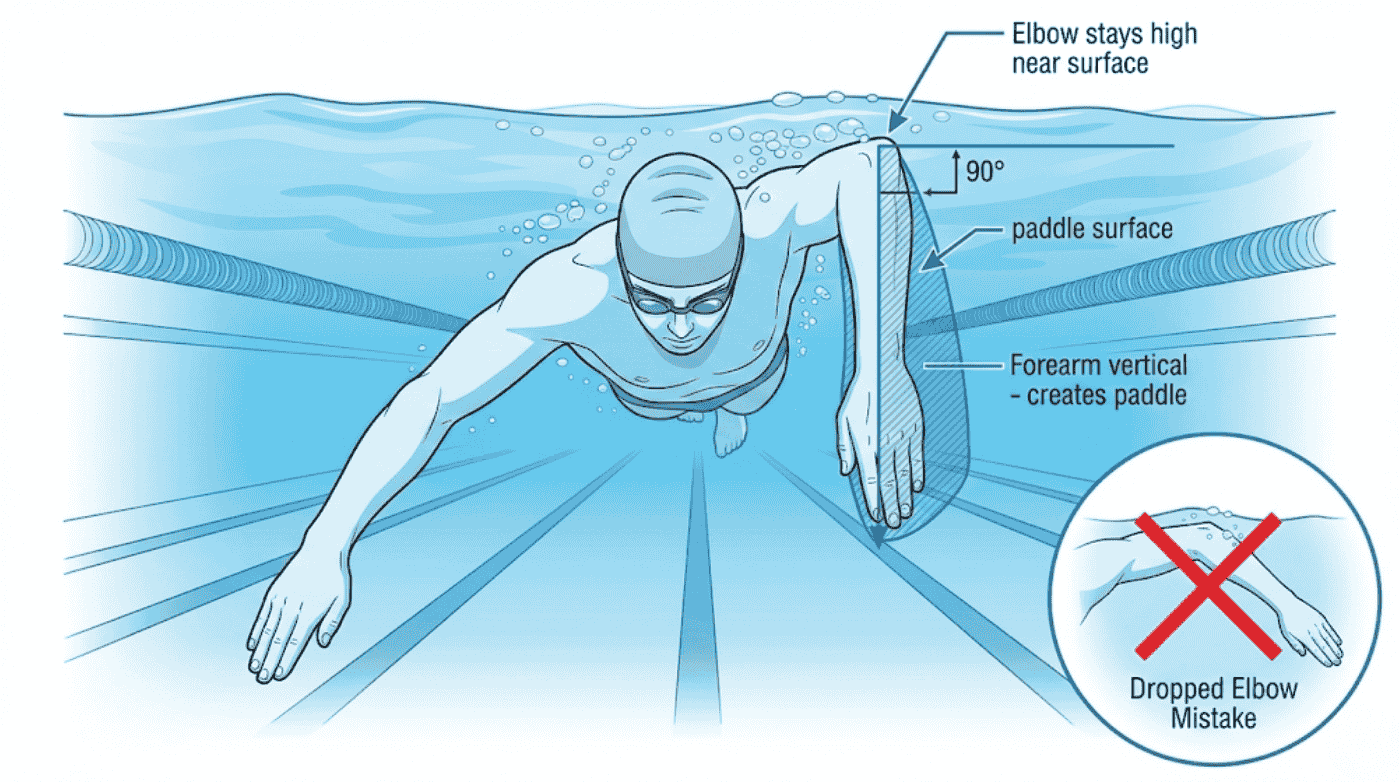
After your hand enters and extends, your forearm drops downward toward the pool bottom. Meanwhile, your elbow stays high—near the surface. Your forearm and hand form a single paddle surface, ready to push water backward. Without this paddle position, you’re slipping through water instead of pushing against it.
The Early Vertical Forearm (EVF)
You’ll hear “high elbow catch” or “early vertical forearm.” Same concept. Get your forearm perpendicular to the pool bottom quickly after entry, while keeping your elbow near the surface. When the catch is right, it feels like your hand is anchored while your body moves past it.
Common Catch Mistakes
- Dropped elbow– Elbow sinks, palm faces down instead of back, propulsion disappears
- Pulling too early– Starting backward pull before setting up paddle position
- Straight arm catch– Skipping the catch; stresses shoulder, generates less power
Self-Check:
☐ Feel solid resistance against palm and forearm early in stroke
☐ Elbow stays higher than wrist during catch
☐ Body moves past hand (not hand slipping past water)
Common Questions Related To Catch
What is an early vertical forearm? Getting your forearm perpendicular to the pool floor quickly after hand entry, while keeping elbow high near the surface. Creates a large paddle to push backward.
Why do I keep dropping my elbow? Usually lack of shoulder mobility, pulling too soon, or fatigue. Try a catch-up drill or fingertip drag drill to rebuild the feeling.
Phase 3: The Pull
This is where power happens. Entry and catch were setup. Now you’re creating forward motion.
Once your catch is set, pull straight back. Not in an S-curve. The old coaching advice about S-patterns was wrong—high-speed video of elite swimmers showed they actually pull relatively straight. The apparent S-pattern was an optical illusion caused by body rotation.
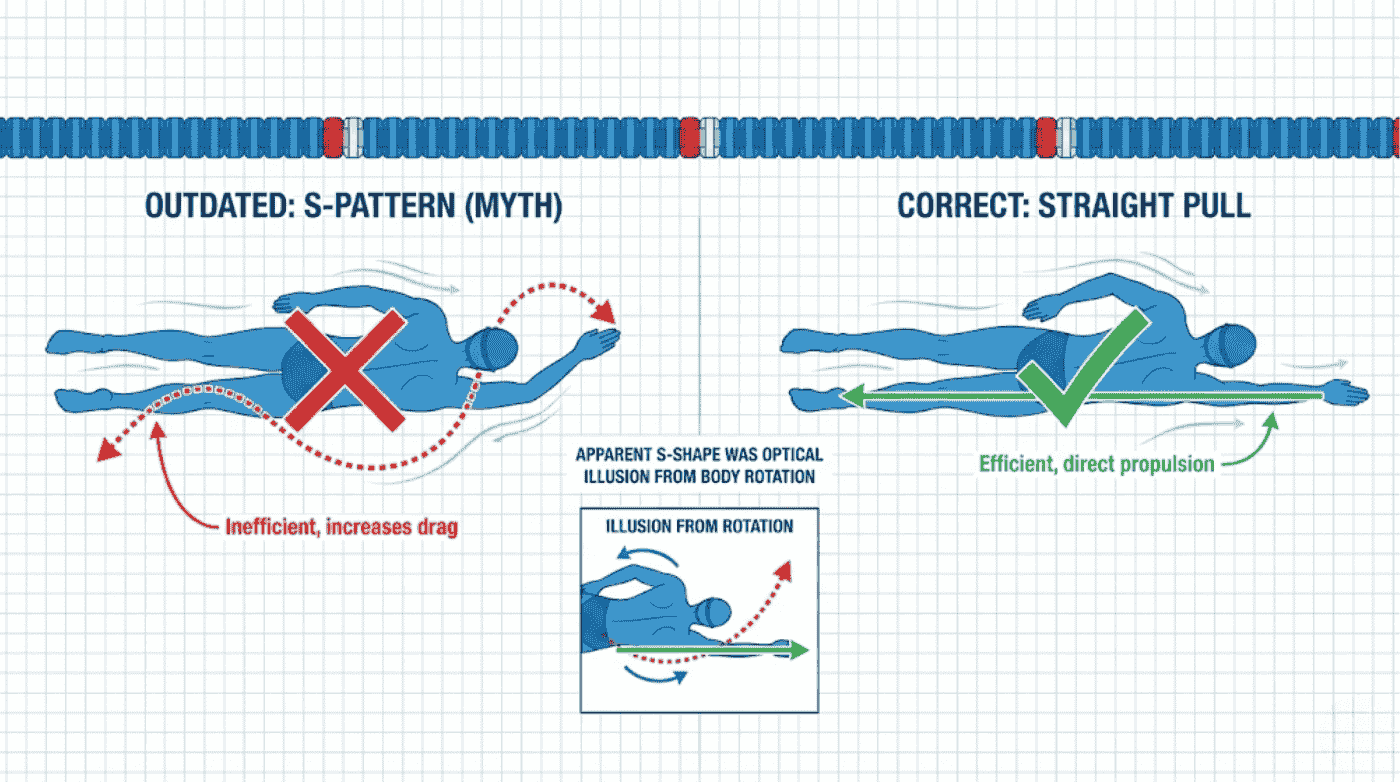
Keep your hand and forearm working as one paddle. And accelerate through the pull—start slower, finish faster. Your hand should move quickest as it approaches your hip. Exit around your hip—not down by your thigh, not up by your ribcage.
If your arms burn out before the rest of you, you’re probably pulling with the wrong muscles. The heavy lifting should come from your lats and core, not your arm muscles. When technique is right, you feel it in your back after a hard set.
Common Pull Mistakes
- S-pattern pull– Outdated; pull straight back
- Crossing midline– Hand crosses under body’s center; creates torso wiggle
- Cutting pull short– Exit at hip, not earlier
- Pushing down– Lifts body instead of propelling forward
Self-Check:
☐ Pull accelerates (faster at end than beginning)
☐ Feel back muscles engaging, not just arms
☐ Hand exits near hip
☐ Hand travels backward, not crossing underneath
Common Questions Related To Pull
Should I pull in an S-pattern or straight back? Straight back. Modern video analysis showed elite swimmers pull relatively straight—the S-shape was an optical illusion from body rotation.
Where should my hand exit? Around your hip. Exiting near ribcage means you’re cutting short. Pushing to your thigh wastes energy pushing down.
Why do my shoulders hurt after swimming freestyle? Usually signals dropped elbow, crossover entry, or straight arm pulling. These stress the shoulder joint instead of distributing force through larger back muscles.
Phase 4: The Recovery
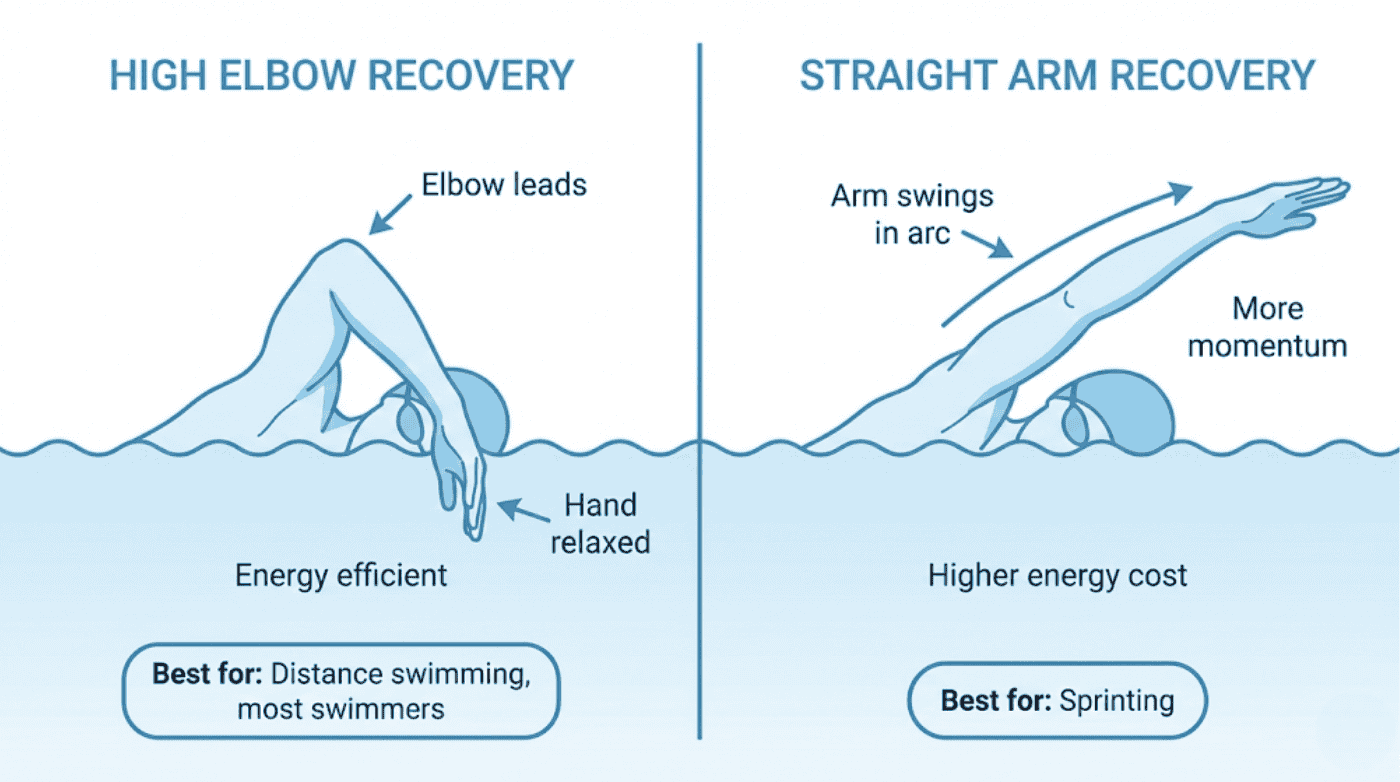
Recovery is your arm’s brief rest period within each stroke. Your hand exits near your hip and swings forward above the water. The momentum from your pull exit helps drive this motion—you’re not muscling your arm forward. During recovery, your arm should feel relaxed.
High elbow recovery
Elbow bends and leads forward, hand dangles close to water. Classic distance technique. Energy-efficient, easier on shoulders.
Straight arm recovery
Arm swings forward relatively straight. Sprinters use this for speed and momentum. High elbow is generally better for most swimmers.
Common Recovery Mistakes
- Over-rotation– Excessive body roll throws off balance
- Swinging too wide– Creates lateral forces pushing you side to side
- Tensing the arm– Wastes energy; relax hand and wrist
- Dragging hand through water– Hand should clear the surface
Self-Check:
☐ Recovery arm feels relaxed
☐ Hand clears the water
☐ Recovering in fairly straight line, not swinging wide
Common Questions Related To Recovery
Should my elbow be high or low? High elbow for most swimmers—saves energy, reduces shoulder strain, sets up cleaner entry. Straight arm works for sprinting.
How do I relax my arm during recovery? Think “floppy hand.” Let gravity and momentum do the work. Practice finger drag drill—drag fingertips up your side to force bent elbow and relaxed hand.
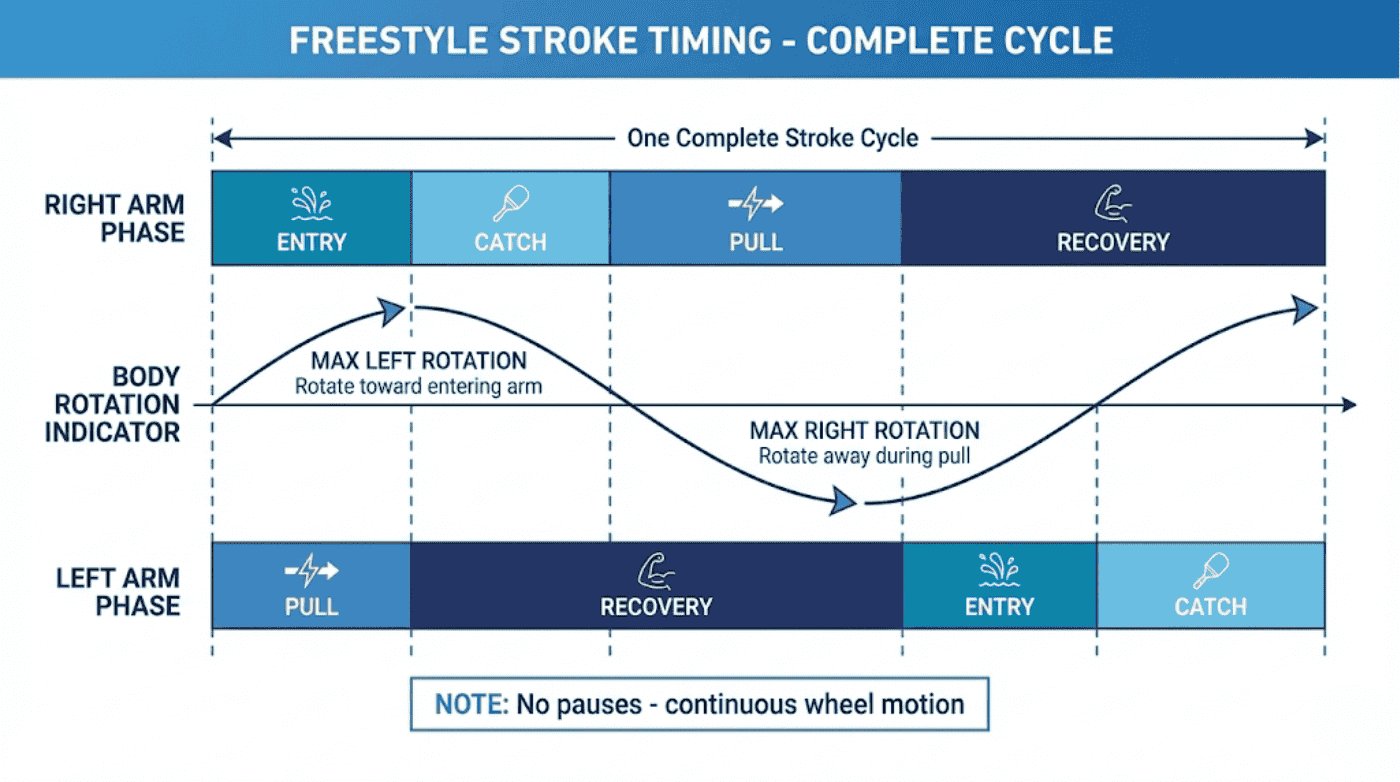
Putting It All Together: Timing and Transitions
There shouldn’t be pauses in your stroke. Entry flows into catch. Catch sets up pull. Pull launches recovery. Recovery prepares entry. Like a wheel turning.
Body rotation timing
As one arm enters, your body rotates toward that side. As you pull, your body rotates away. Rotation comes from your hips—shoulders follow. Good rotation makes your pull more powerful and breathing easier.
Opposite arm timing
Different styles exist—catch-up timing (arms nearly touch in front), front quadrant timing (entering hand starts catch while other arm is mid-pull), or overlap timing. What matters is consistency and smoothness.
Drills by Phase
Entry: Fingertip drag, six-kick switch
Catch: Fist drill, front sculling
Pull: Paddle work, closed fist freestyle
Recovery: Fingertip drill, single-arm freestyle
How Technique Differs by Swimmers Skill Level
Beginners: Focus on clean entry (no slapping, no crossover), basic pull pattern (back toward hip), and relaxed recovery. Don’t worry about EVF yet.
Intermediate: Develop your catch (high elbow position), refine pull (straighter path, acceleration), work on body rotation timing.
Advanced: EVF mastery, acceleration patterns, race-specific adjustments.
What Would Be Your Next Steps?
Focus on one phase at a time—pick your weakest link and drill it for a few weeks. Record video if possible; the gap between what you feel and what you see is often surprising. Four to six weeks of consistent, focused work usually produces noticeable improvement.
Working with a qualified instructor—even for a few sessions—accelerates progress dramatically. An experienced eye spots things you’ll never feel on your own.
At Rocket Swim Club in Toronto, we teach all four arm movements as part of our structured progression system. Our expert coaches bring national team experience to swimmers at every level. If you’re in the Toronto area, check out our competitive programs, non-competitive lessons, or private instruction.
Frequently Asked Questions
What are the 4 arm movements in freestyle?
Entry (hand enters in front of shoulder), catch (forearm drops while elbow stays high), pull (arm pushes water backward toward hip), and recovery (arm swings forward above water). Together they form one continuous stroke cycle.
Which phase is most important?
The catch typically determines how much power you can generate in the pull. But each phase affects the next—they’re equally important links in a chain.
How can I tell if my technique needs work?
Warning signs: sore shoulders after little swimming, feeling like you’re working hard but going slowly, bubbles trailing your hand during pull, or wiggling side-to-side.
Should I use a bent or straight arm?
Bent throughout most of the stroke. Straight only when extending after entry and briefly during recovery.
How long to improve arm technique?
With focused practice, most swimmers see noticeable improvement in 4-6 weeks.