
Breaststroke looks deceptively simple. Watch someone swim it, and you see a straightforward pattern: arms sweep out, legs kick, body glides. Then you try it yourself and wonder why you’re working twice as hard to go half as fast as the swimmer in the next lane.
This disconnect exists because breaststroke is the oldest swimming stroke—humans have been doing some version of it for thousands of years—yet it remains one of the most technically demanding to master. It’s the slowest of the four competitive strokes, which means technique matters more than raw power. Small errors compound into major drag. Poor timing turns your propulsion against itself.
This guide breaks down every component of breaststroke: body position, arm movement, the kick that generates most of your power, breathing mechanics, and the timing that ties everything together.
You’ll learn to identify and fix the mistakes that slow most swimmers down. And because breaststroke puts unique stress on the knees, you’ll understand how to protect yourself from injury—something most instructional content ignores entirely.
Let’s dive in….
What Makes Breaststroke Different from Other Strokes
Breaststroke stands apart from freestyle, backstroke, and butterfly in nearly every way. Understanding these differences explains why the stroke requires its own approach to learning and training.
First, breaststroke is the only stroke where your arms recover underwater. In freestyle, backstroke, and butterfly, your arms swing over the surface during recovery. Breaststroke keeps them submerged, which creates substantially more resistance. This is why body position matters so much—you’re fighting drag that other strokes avoid.
Breaststroke is a short-axis stroke. Your body pivots around your hips, moving up and down rather than rotating side to side like freestyle and backstroke. Butterfly shares this characteristic, but breaststroke’s movement pattern is more pronounced and deliberate. Power originates from your hips and travels outward through your limbs.
The kick is completely unique. No other stroke turns the feet outward or uses the circular whipping motion that drives breaststroke propulsion. Freestyle, backstroke, and butterfly all use variations of pointed-toe kicking. Breaststroke demands you flex your feet and rotate your ankles outward—a position that feels unnatural until you’ve drilled it extensively.
Finally, breaststroke has a distinct stop-start rhythm. You pull, you kick, you glide. Other strokes maintain continuous motion. Breaststroke builds in a pause—the streamline position between strokes where you hold still and let momentum carry you forward. Getting this timing right separates efficient swimmers from those who exhaust themselves covering the same distance.
A Brief History of Breaststroke
Cave paintings in the Cave of Swimmers in Egypt, dating back roughly 10,000 years, depict figures using movements that resemble breaststroke. This makes it the oldest documented swimming technique, predating all others by millennia.
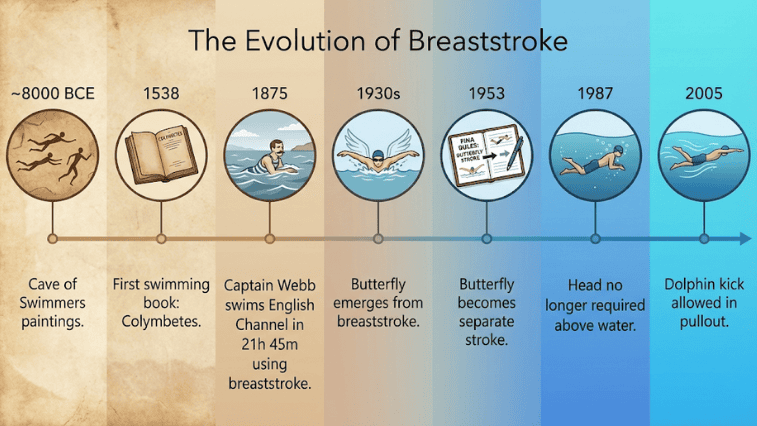
The first formal swimming instruction book, Colymbetes, appeared in 1538 and described breaststroke as the primary method for swimming—particularly for drowning prevention. For centuries, this was simply how Europeans swam.
In 1875, Captain Matthew Webb became the first person to swim the English Channel without artificial aids. He used breaststroke exclusively, completing the crossing in 21 hours and 45 minutes. Butterfly emerged from breaststroke in the 1930s when swimmers began recovering their arms over the water; it became a separate stroke in 1953.
Two rule changes shaped modern technique. In 1987, officials removed the requirement that swimmers keep their head above water throughout the stroke—allowing dramatically better body position. In 2005, a single dolphin kick became permitted during the underwater pullout.
Breaststroke Body Position: The Foundation
Why Body Position Matters More in Breaststroke
Breaststroke creates the most drag of any competitive stroke. Your arms and legs both recover forward through the water rather than over it. Every stroke cycle, you’re pushing against resistance that freestyle swimmers avoid.
Poor body position amplifies this problem. If your hips drop and your body angles downward, you’re essentially swimming uphill. You expend energy fighting water that should be flowing smoothly past you. Good position lets you capitalize on the power you generate with your pull and kick.
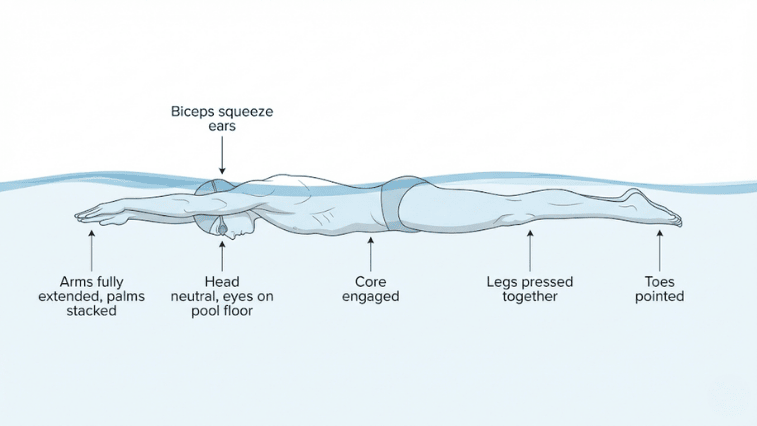
The Streamline Position
Streamline is both the starting point and the finishing point of every stroke cycle. Get it right, and you slip through the water with minimal resistance. Get it wrong, and you’re wasting the propulsion you worked to create.
Arms extend fully overhead with hands together, one palm resting on the back of the other. Squeeze your biceps against your ears. Your body forms a single straight line from fingertips to toes. Legs press together, toes pointed. Head stays neutral, tucked between your arms with eyes looking at the pool floor. Practice this position on land first—stand with your back against a wall and reach overhead. Your spine, head, and heels should all touch the wall.
Keeping Hips High
Hips that sink below the surface create frontal drag. Your legs end up beneath you rather than behind you, and you plow through the water instead of slicing through it.
Head position controls hip position. Look too far forward and your hips drop. Tuck your chin and direct your gaze downward at about 45 degrees, and your hips rise. When you’re in streamline position, you should feel water flowing over your back, not under your chest.
Core engagement makes this possible. Your abdominal muscles connect your shoulders to your hips. Keep them activated throughout the stroke cycle, and your body stays aligned as a unit rather than bending in the middle.
Breaststroke Arm Movement: The Pull
The arm pull generates roughly 30% of your breaststroke propulsion.
That percentage is lower than other strokes, but the pull serves multiple purposes: it initiates the stroke cycle, lifts your body for breathing, and sets up the powerful kick that follows.
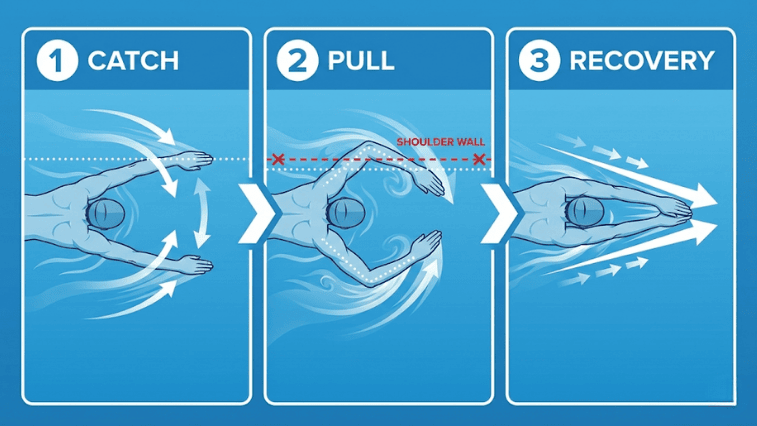
The Catch Phase
Start from streamline with arms extended. Rotate your thumbs downward so your palms angle slightly outward. Sweep your hands apart to about shoulder width. Move slowly and deliberately—rushing this setup reduces what you get from the pull.
The catch isn’t about grabbing water. Think of it as positioning your forearm and hand to create a large paddle. Your entire forearm should engage with the water, not just your palm. Feel pressure building against your arm from fingertips to elbow.
The Pull Phase
Once your hands reach shoulder width, bend your elbows and sweep your hands downward and inward. Your elbows stay high—near the water’s surface—while your hands travel below them. This high-elbow position engages your back muscles, particularly your lats, which are far stronger than your arms alone.
Bring your hands together under your chin. The pull finishes here. This is the critical point most swimmers get wrong: your hands should never travel past your shoulders. Pulling too deep or too wide creates drag that cancels out your propulsion.
Imagine a wall at shoulder level. Your hands sweep out toward it, press down, and come together—but they never break through to the other side. This mental image helps correct the instinct to pull all the way back.
The Recovery Phase
From under your chin, shoot your hands forward to return to streamline. Accelerate through this movement—don’t pause at your chest. Keep your hands close together and your elbows tight to your body. Every inch of width adds drag.
Think of the recovery as throwing your hands toward the far end of the pool. Your arms should arrive at full extension as your head returns to the water. The timing matters: if your arms recover too slowly, you’ve lost the momentum from your pull before your kick can take over.
Breaststroke Kick: Where the Power Comes From
Why the Kick Matters So Much
In freestyle, your arms do most of the work. Breaststroke reverses that ratio. Your kick generates roughly 70% of your propulsion. A weak kick means going nowhere regardless of how well you pull. A wide kick means creating massive drag that slows you down.
The breaststroke kick is unlike any other motion in swimming. Your feet turn outward rather than pointing like in every other stroke. Your legs move in a circular path rather than straight up and down. Mastering this movement takes deliberate practice because nothing else in athletics prepares you for it.
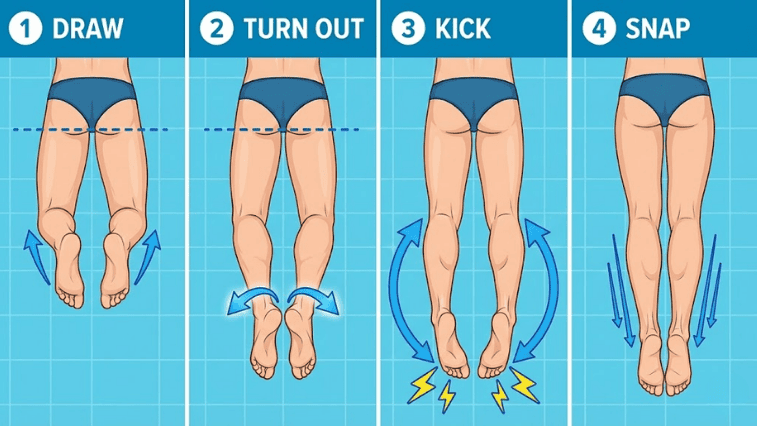
Step-by-Step Kick Breakdown
Step 1: From streamline, draw your heels toward your butt by bending at the knees. Keep your thighs relatively still—the movement comes from hinging at your knees, not from bringing your knees toward your chest. If you watch from the side, your thighs should stay close to horizontal.
Step 2: Turn your feet outward so your toes point toward the sides of the pool. Your ankles rotate until your soles face backward. This is the “catch” of your kick—the position from which you’ll generate propulsion.
Step 3: Kick backward and around in a circular motion. Your feet trace an arc, pushing water directly behind you. The power comes from extending your legs while maintaining that outward foot position.
Step 4: Snap your legs together and point your toes. Return to streamline with legs fully extended and pressed tight. Hold this position during your glide phase.
The Width Question: How Wide Is Too Wide?
Kick width varies by swimmer based on hip flexibility and body proportions. A general guideline: knees should be about shoulder-width apart at the widest point. Wider than that usually costs more in drag than you gain in power.
The most important principle is kicking straight backward—if your knees flare wider as you kick, you’re pushing water sideways rather than backward.
Breathing in Breaststroke
Breathing in breaststroke is more natural than in other strokes—your face comes forward out of the water rather than turning to the side. But common mistakes with breathing mechanics still hurt many swimmers’ speed and efficiency.
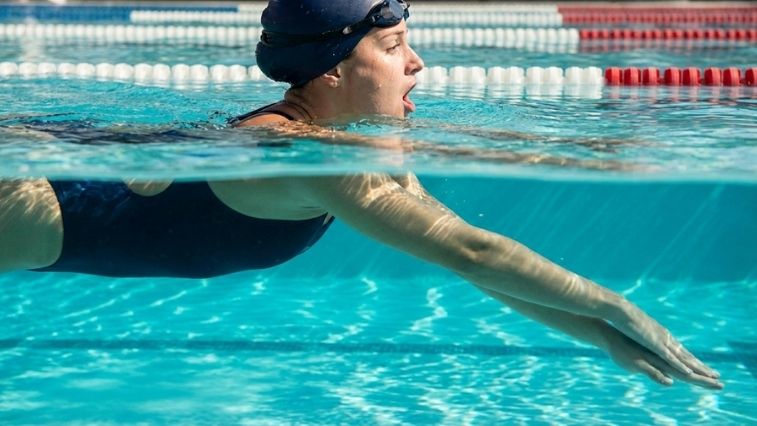
Your body rises naturally during the pull phase. As your arms sweep in and your elbows draw back, your shoulders lift and your chin clears the water. Keep your chin low—it should just clear the surface. Lifting your head too high causes your hips to sink. Look at the pool deck in front of you rather than the ceiling.
Inhale through your mouth quickly as your arms finish pulling. Begin exhaling as soon as your face returns to the water, continuing through the glide and into the next stroke cycle. Holding your breath creates tension and means you need to exhale and inhale during your next breath window—which isn’t enough time.
How To Maintain Timing and Coordination in Breaststroke
The Golden Rule: Pull, Kick, Glide
Never pull and kick at the same time. This is the single most important rule in breaststroke timing. When you pull and kick simultaneously, you’re pressing the gas and brake together—your kick creates forward momentum while your recovering arms create backward drag, and the forces partially cancel out.
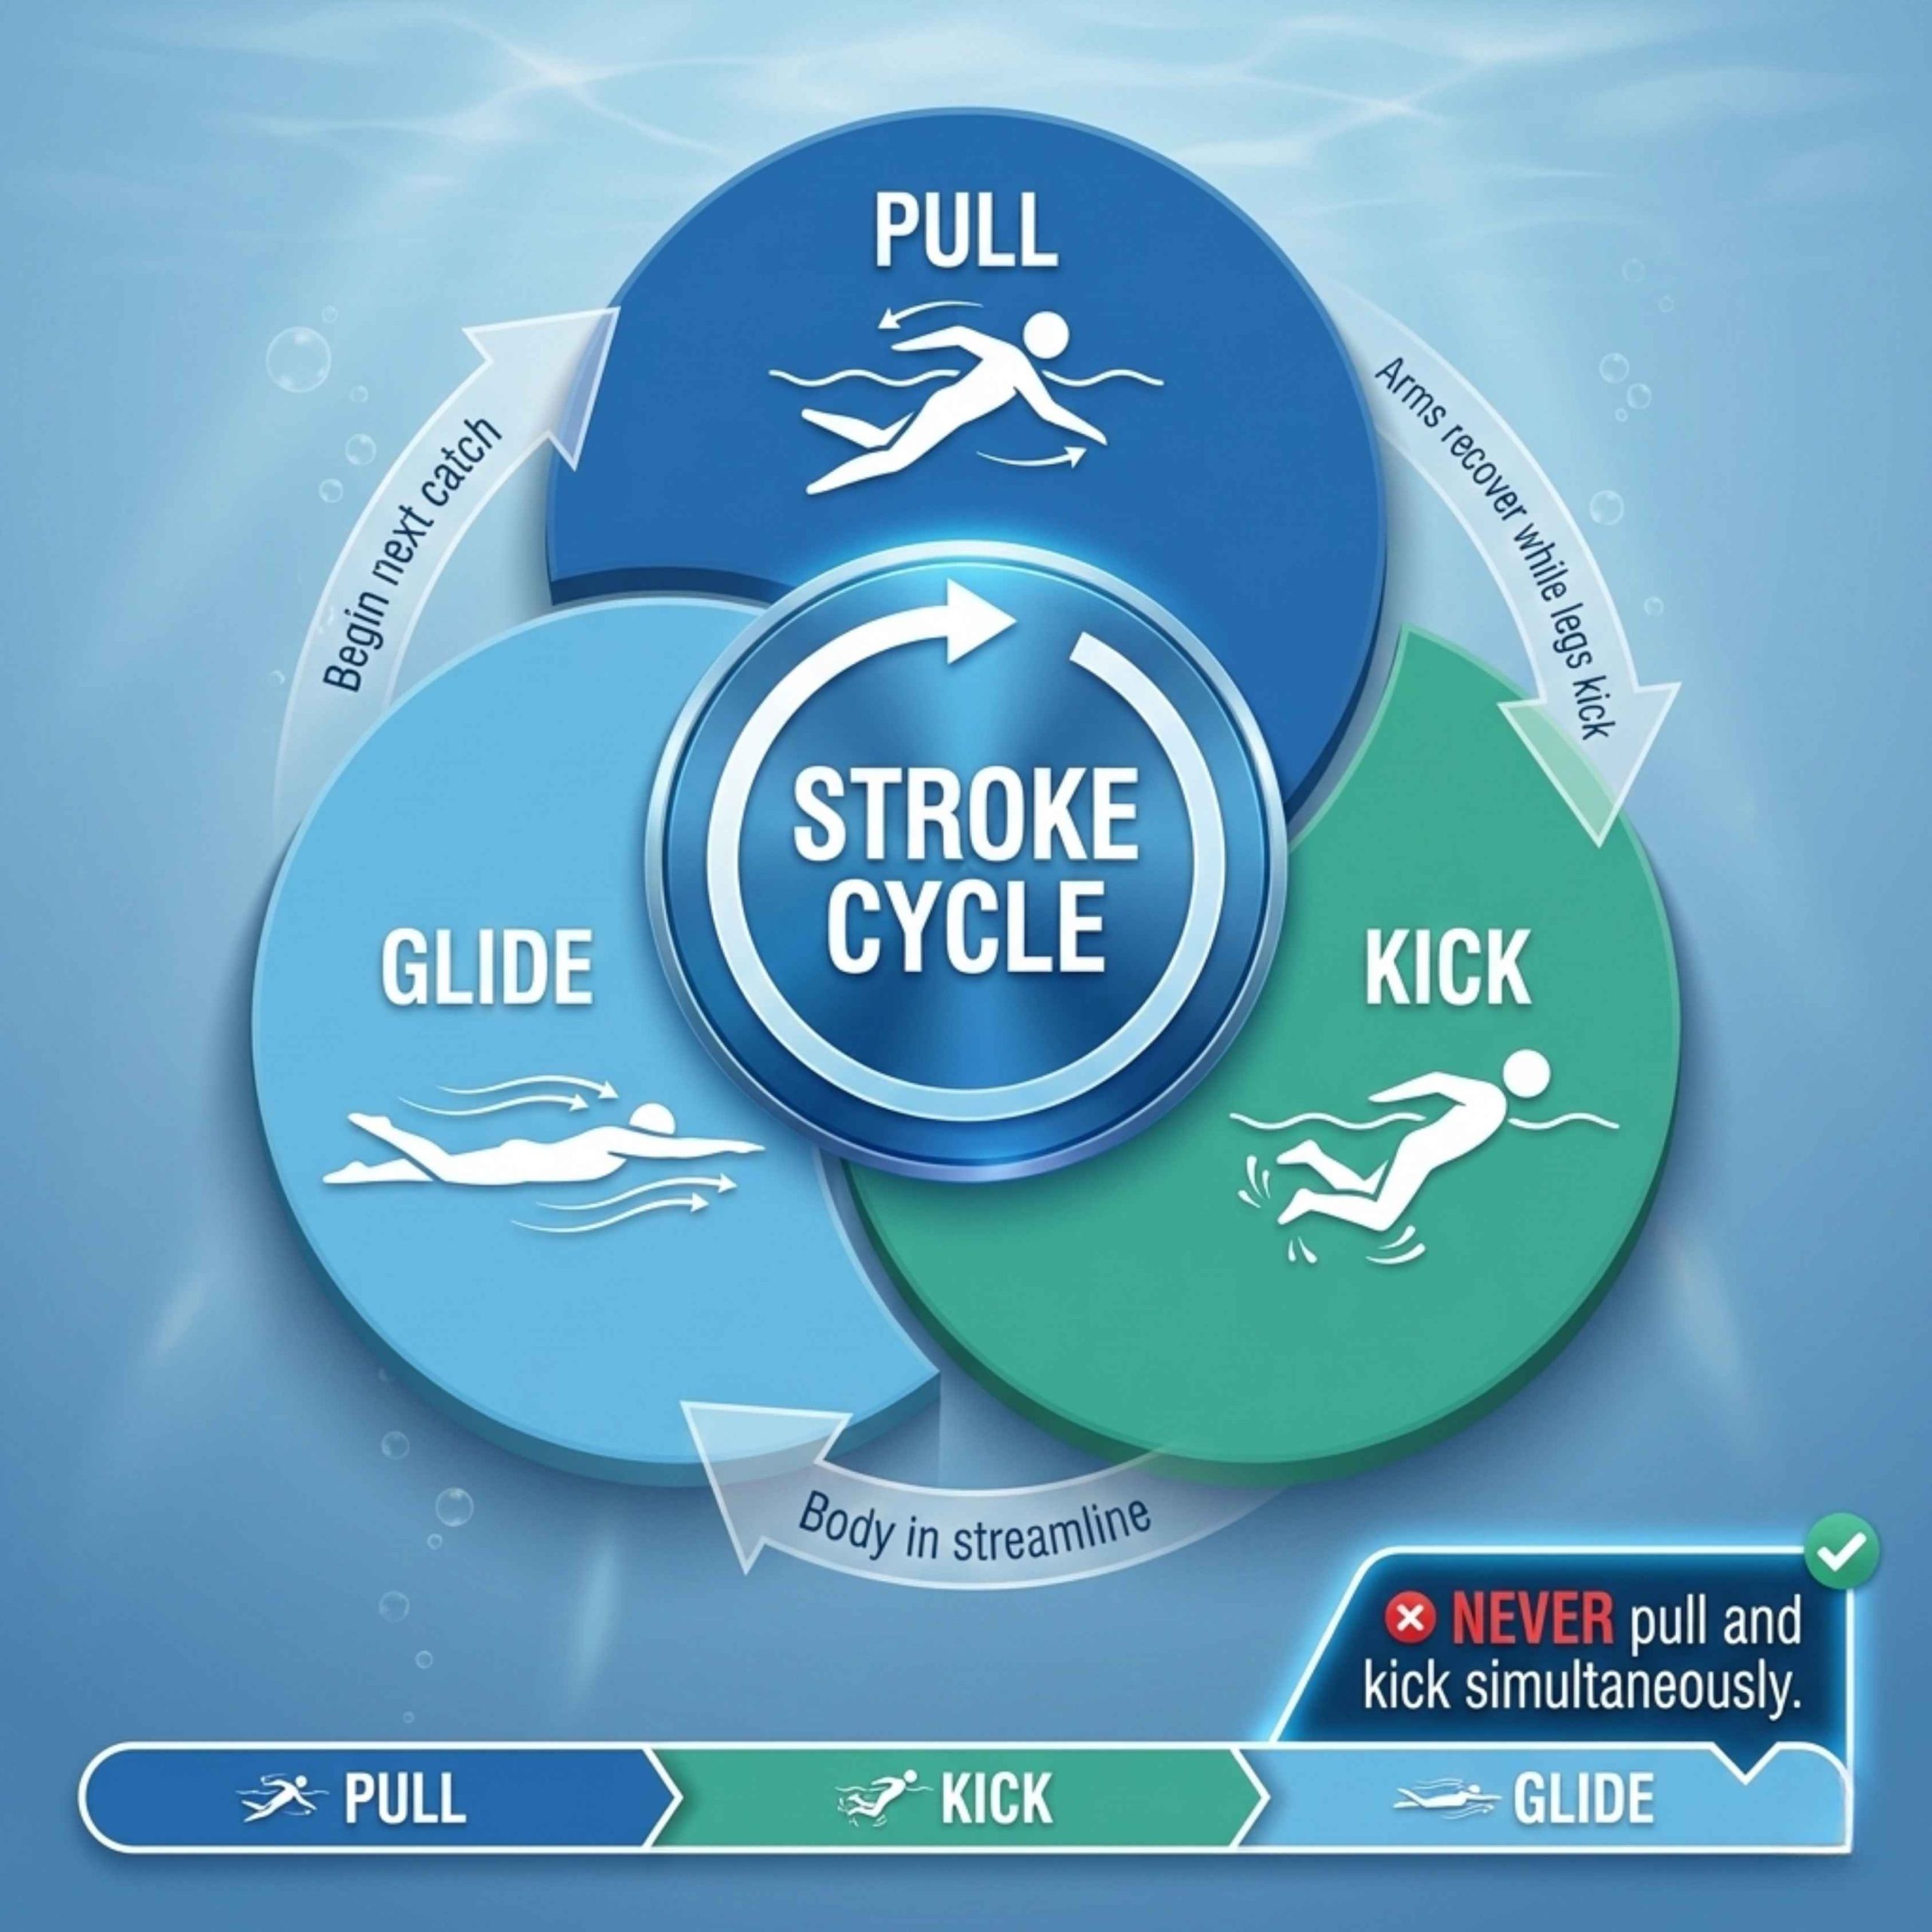
The sequence works like this: your arms pull while your legs stay streamlined behind you. Then your arms shoot forward to recover while your legs kick. Finally, you hold streamline and glide, letting your kick’s momentum carry you forward.
Each component happens when the other is minimizing drag. Your kick propels you forward at the exact moment your body is most streamlined. Your arms pull when your legs are extended and creating minimal resistance.
Finding Your Rhythm
Say “pull-kick-glide” in your head while you swim. Match each word to the corresponding action. Glide length adjusts based on your goals: sprinting means shorter glides and higher stroke rates; distance swimming means longer glides with each stroke carrying you farther.
A stronger kick allows for a longer glide because you have more momentum. If you’re working hard but not covering distance, you’re probably starting your next stroke before the current one finishes paying off.
Common Breaststroke Mistakes and How to Fix Them
| Mistake | What Goes Wrong | How to Fix It |
|---|---|---|
|
1 Pulling Too Wide or Deep |
Your hands travel past your shoulders, creating drag that erases your propulsion. The pull feels powerful but actually works against you. | ✓ FIX
Imagine a wall at shoulder level. Practice slow-motion breaststroke stopping your hands before they reach your shoulders. Your pull should feel shorter than you think. |
|
2 Head Too High When Breathing |
Your chin lifts toward the ceiling, your hips sink, and you end up swimming uphill. This dramatically increases drag every stroke. | ✓ FIX
Keep your eyes on the pool deck, not the far wall. Practice breathing with your chin barely clearing the water. Film yourself from the side to check. |
|
3 Scissors Kick |
Your feet don’t match — one turns out properly while the other stays pointed or turns inward. This asymmetry wastes power and signals a flexibility imbalance. | ✓ FIX
Kick on your back where you can watch your feet. Have a coach or partner observe your kick underwater to spot the imbalance. |
|
4 Skipping the Glide |
You rush from kick directly into the next pull without pausing in streamline. This wastes the momentum your kick created. | ✓ FIX
Count “one-one-thousand” in streamline after each kick. Hold that position before initiating your next stroke. |
|
5 Knees Too Wide |
Knees spread apart excessively during kick recovery, creating drag in front of your thighs and stressing your joints. | ✓ FIX
Focus on bringing your heels toward your butt rather than knees apart. They separate naturally when feet turn out — don’t force them wider. |
|
6 Pausing at Chest |
Hands stop under your chin before shooting forward, breaking your rhythm and creating a dead spot in your stroke. | ✓ FIX
Accelerate through the recovery. Think: in-squeeze-forward with no hesitation. Practice arm drills with fast hands and slow kicks. |
Protecting Your Knees: Breaststroke Safety
Why Breaststroke Can Be Hard on Knees
The breaststroke kick places lateral stress on your knee joints that no other swimming stroke creates. Your medial collateral ligament (MCL) stretches during the outward rotation of the kick, and the repetitive motion can lead to inflammation and pain over time.
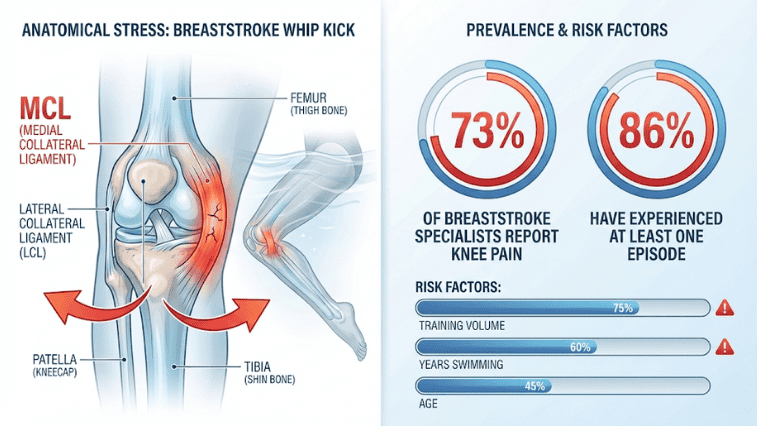
Research on competitive swimmers found that 73% of breaststroke specialists reported knee pain, compared to 48% of swimmers who primarily swam other strokes. Another study found 86% of breaststrokers had experienced at least one episode of breaststroke-related knee pain. Risk increases with training volume, years of competitive swimming, and age.
How to Protect Yourself
Keep your kick narrower rather than wider. A narrower kick reduces the valgus stress on your knee—the outward force that strains the MCL. You may sacrifice some power, but you protect the joint that has to last your entire swimming career.
Strengthen the muscles that support your knee. Your hips, glutes, and hamstrings all play protective roles. Strong hip external rotators reduce the load on your knee during the kick. Glute activation exercises before breaststroke training can help. Research suggests that swimmers with less hip internal rotation flexibility experienced more frequent knee pain—hip mobility work matters.
Warm up properly before breaststroke-heavy workouts. Cold muscles and connective tissue are more vulnerable to strain. Research found a correlation between shorter warm-up distances and more frequent knee pain.
Mix your strokes. Swimmers who do breaststroke exclusively accumulate repetitive stress without recovery. Incorporate freestyle, backstroke, and other training into your routine to give your knees rest.
Pay attention to pain. Mild discomfort that disappears after warming up differs from persistent pain that worsens during training. If your knees hurt consistently during breaststroke, reduce your volume and consult a sports medicine professional. At Rocket Swim Club, our coaches monitor swimmers’ technique closely, correcting kick mechanics that put excessive stress on knee joints—part of our Eastern European methodology that emphasizes long-term athletic development.
When Am I Ready to Advance? A Simple Progression Framework
Knowing when you’re ready to move from learning breaststroke to developing it, and from developing it to competing, helps you train effectively and avoid frustration. Here’s how to assess your current stage:
Stage 1 – Learning: You can complete 25 meters with recognizable technique. Arms move together, legs kick together, your head goes in the water between strokes. The timing may be inconsistent and your form breaks down when you’re tired, but the basic pattern is there.
Stage 2 – Developing: Your timing is consistent—pull, then kick, then glide, every stroke. Your kick shows proper foot position with toes turned outward. You can maintain technique for multiple lengths without major breakdown.
Stage 3 – Refining: You can swim 100 meters continuously with good form. Your body stays streamlined between strokes. Breathing doesn’t disrupt your rhythm or cause your hips to drop. You’re working on efficiency—covering more distance per stroke rather than just completing lengths.
Stage 4 – Competitive Ready: You know the rules. Your turns and starts are legal. You can execute the underwater pullout after starts and walls. You can race without risk of disqualification for technical violations.
Signs you need more practice at your current stage: exhaustion after short distances, inconsistent kick (sometimes correct, sometimes scissors), inability to maintain stroke quality through an entire length, timing that falls apart under fatigue.
Swimmers in the Greater Toronto Area looking to progress through these stages benefit from structured coaching. Rocket Swim Club’s swimming programs—from our Non-Competitive Novice levels through Junior and Senior Competitive teams—use systematic progression with clear benchmarks, so swimmers and parents always know where they stand and what comes next.
Your Breaststroke Starts with the Basics
Breaststroke rewards patience. The stroke that looks simplest requires the most precision—body position that minimizes drag, arms that pull in a tight window, a kick that generates power while protecting your knees, breathing that doesn’t sink your hips, and timing that keeps pull and kick from fighting each other.
Work on one element at a time. Drill each component until it feels automatic before adding the next. Film yourself underwater when possible—what you think you’re doing and what you’re actually doing rarely match.
Every swimmer who looks effortless in the water spent hours looking anything but. The efficiency you’re working toward is built stroke by stroke, length by length, season by season.
Professional instruction accelerates this process. A coach sees the errors you can’t feel, identifies compensations you’ve developed, and provides drills targeted to your specific needs. Rocket Swim Club offers trial lessons at our Toronto-area locations where our national-team-trained coaches can assess your technique. Whether you’re just starting breaststroke or refining competitive form, proper instruction prevents bad habits from taking root—and fixes the ones that already have.