

Learning to swim comes down to six skills, learned in order: getting comfortable in the water, floating, breathing, kicking, moving your arms, and putting them together into a stroke. Water carries most of your body weight, so swimming stays gentle on your joints while you learn. Relaxation keeps you afloat. Strength has very little to do with it.
At Rocket Swim we teach adults and children across Toronto and the GTA in this order, starting at the shallow-end steps and finishing with a relaxed length of the pool. Most of our adult beginners swim that length within 8 to 12 lessons.
Read this before you practise anything below. Every drill on this page assumes a lifeguard on duty and someone beside you. Practise in a lifeguarded pool, ideally with an instructor, and never on your own. The Ontario drowning figures further down explain why we lead with this.
What does learning to swim as a beginner involve?
Six skills, built in a deliberate order so that each one rests on the last:
1. Get comfortable in the water
2. Float on your back and front
3. Breathe in a steady rhythm
4. Kick from the hips
5. Add your arms
6. Combine everything into a first stroke
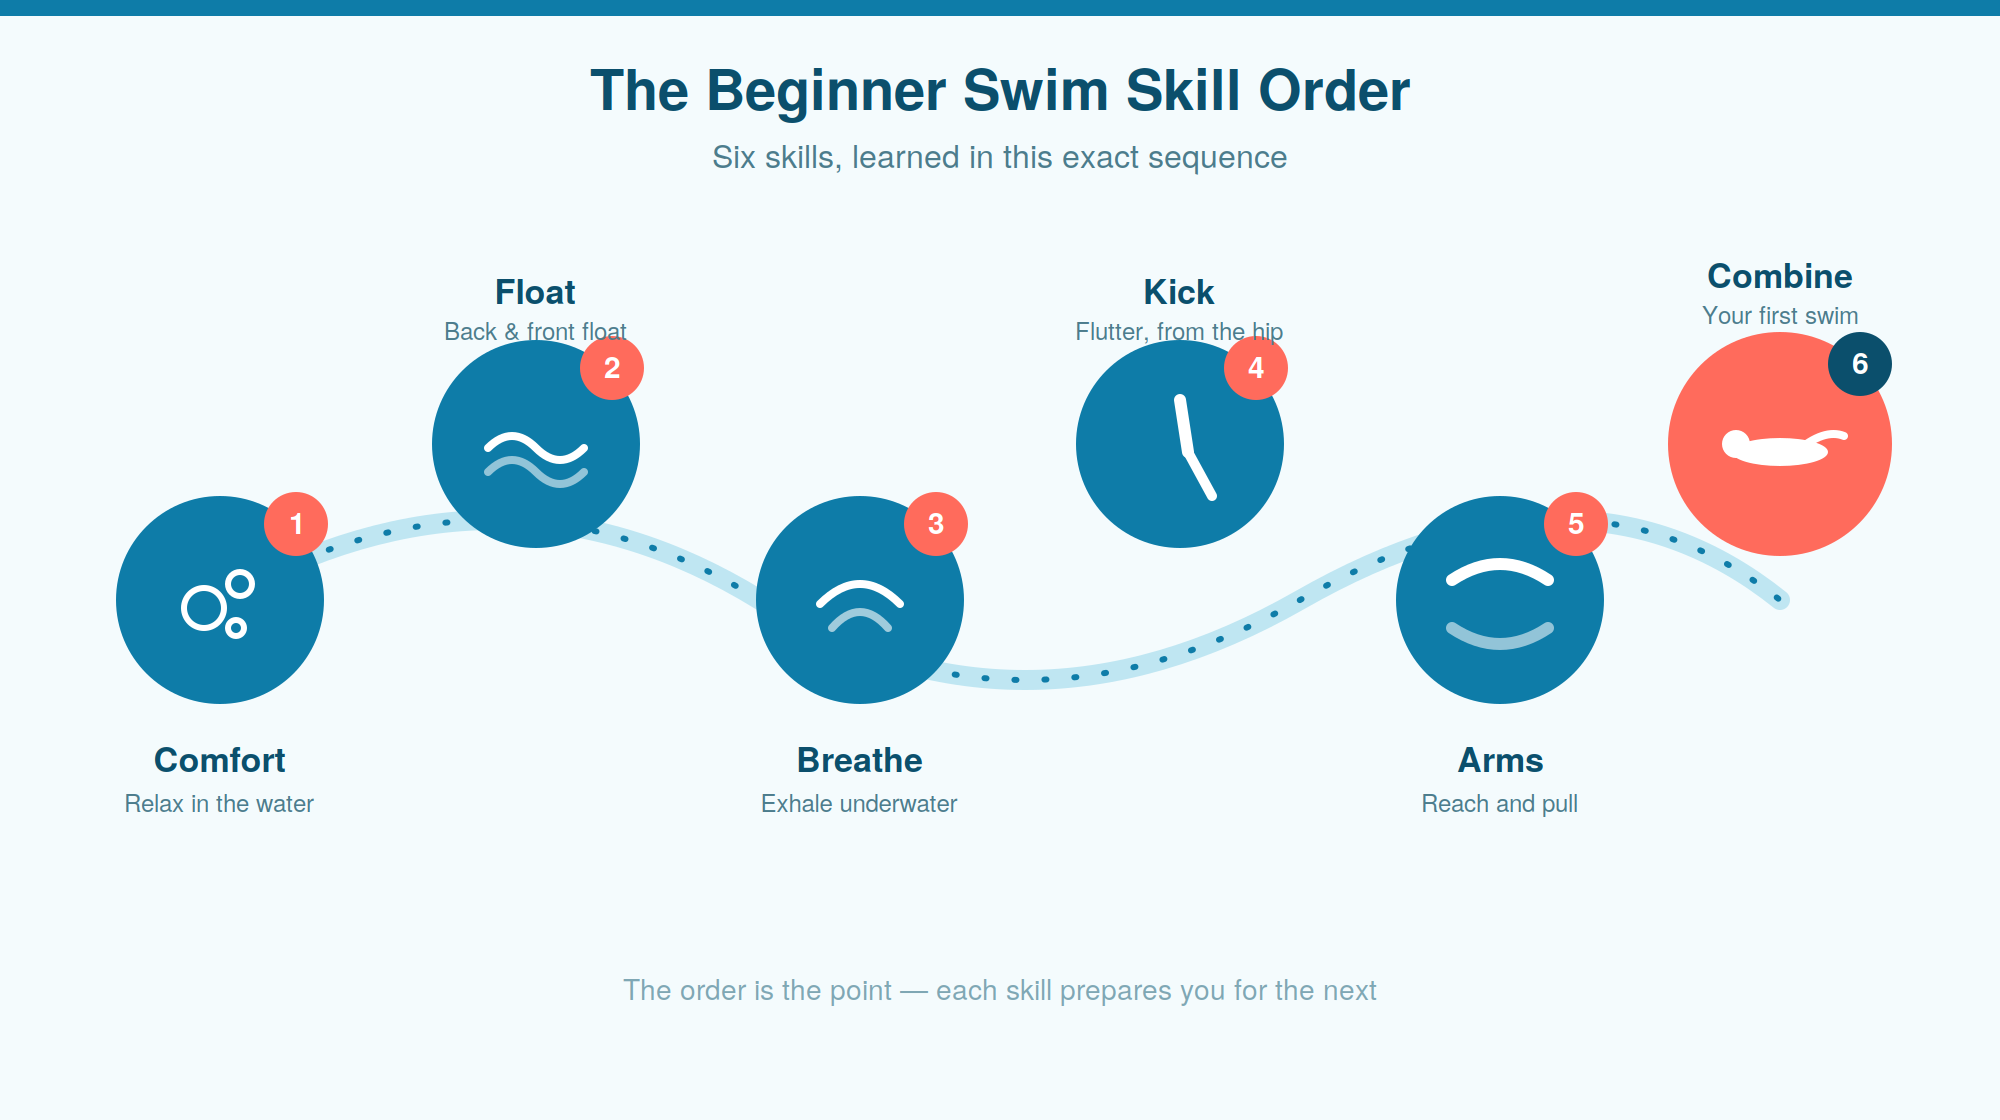
Order carries the weight here. Each skill only works once the one before it feels boring.
How do you get comfortable in the water?
Start by teaching your body that water on your face and over your shoulders is safe. Instructors call this water acclimatisation, and skipping it stalls every skill that follows.
Stand in the shallow end where your head clears the surface and you can reach the wall. Wet your face. Let your shoulders drop under. Stay there until it stops feeling like anything. Then blow gentle bubbles, dip your chin, then your mouth, then your whole face, taking as long as you want at each stage.
Nervousness at this stage is ordinary. In our Toronto lessons, most adults spend a session or two here before anything else happens, and that time is well spent.
How do you float in water as a beginner?
Floating means staying on the surface using buoyancy, the lift you get from the air in your lungs and from staying loose. It works as a safety skill before it works as a swimming skill. A beginner who can float can rest, breathe and stay calm in water too deep to stand in.
Most people fight the water to stay up, which sinks them. You relax instead, and let your legs rise while your lungs do the work.
Give floating about five minutes each session. Set your first milestone at a 30-second back float with no hand on the wall, with your instructor or a companion beside you in the shallow end.
| Back Float | Front Float | |
|---|---|---|
| Face position | Face up, out of the water | Face down, in the water |
| Breathing | Free and easy | Hold, then slow exhale |
| Beginner difficulty | Easiest, so start here | Slightly harder |
| Best for | Resting and staying safe | Preparing to swim forward |
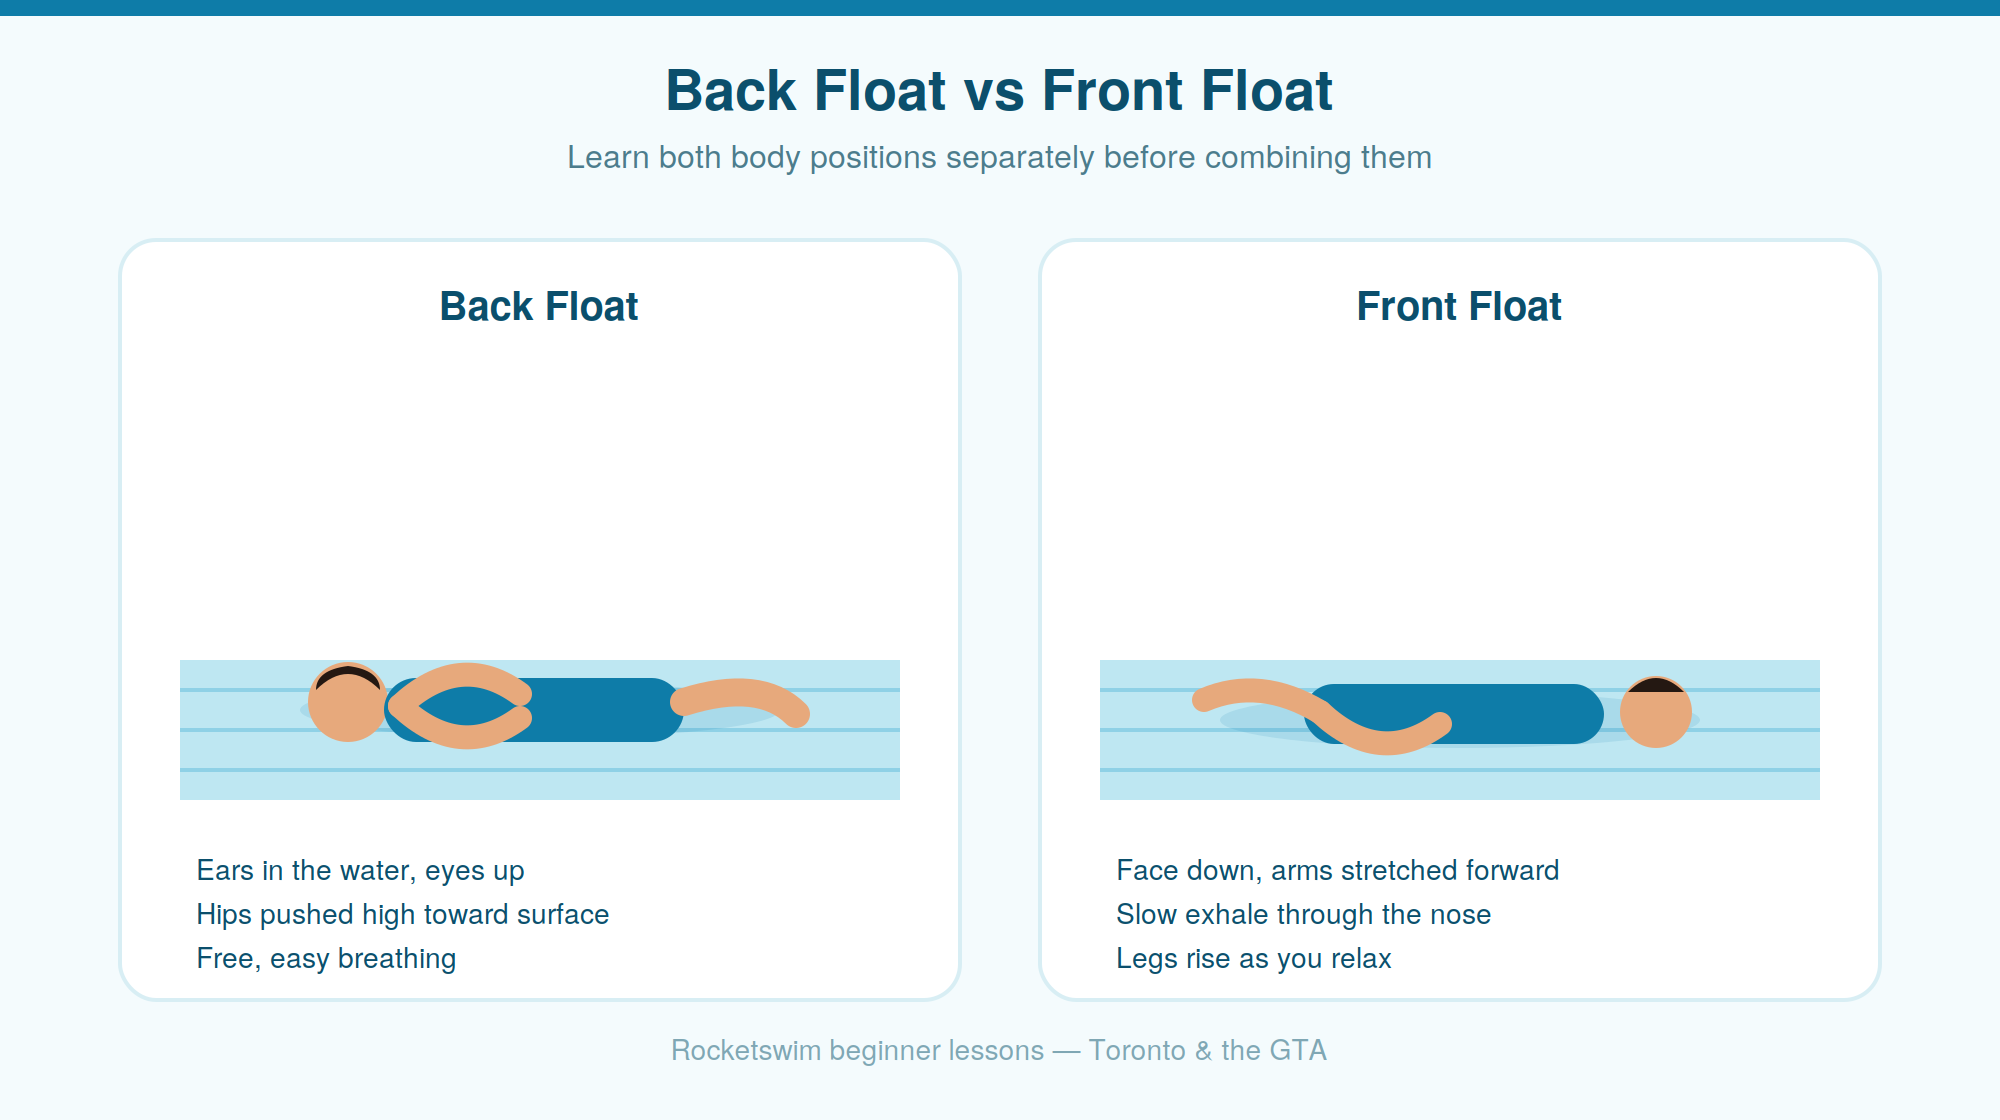
Most beginners find one of these far easier than the other, so learn them separately before you combine them.
How do you do a back float?
Start here. Lie back until your ears are under and your eyes point at the ceiling. Let your hips rise toward the surface and rest your arms out to the sides like a star. Keep your breathing slow and even.
Tuck your chin or lift your head and your hips drop, which sinks you. Keep the head back and the chest open.
How do you do a front float?
Put your face in the water, stretch your arms forward, and exhale slowly through your nose. Stay long and loose. Your legs will rise toward the surface on their own once you stop bracing. Resist the urge to kick or scull, because stillness is what makes the float work.
That slow exhale is the same breathing you need to swim, so time spent on it now pays off in the next section.
How do beginners breathe while swimming?
One rule covers it: exhale continuously underwater, inhale quickly when your mouth clears the surface, and never hold your breath in between. Swimmers call this rhythmic breathing, and getting it wrong is the most common beginner problem we see.
Most adults never exhale underwater at all. They hold the air in, surface with full lungs, and find no room to breathe in. Blow bubbles the entire time your face is down, a steady stream from your nose and mouth, so your lungs are empty and ready when you turn to inhale.
Keep the inhale calm. One quick breath is enough, and gulping wastes the rhythm you just built. Once you exhale underwater without thinking about it, swimming stops feeling frantic.
One safety point on breathing. Never practise breath-holding to stretch your distance, and never do repeated breath-holds or hyperventilate before going under. Both can cause a swimmer to lose consciousness underwater with no warning, and this has killed strong, experienced swimmers. Rhythmic breathing exists so you never need to hold your breath.
What is the bubble-breathing drill?
This drill trains automatic exhaling in about a minute.
1. Stand in chest-deep water where breathing feels easy.
2. Take a normal breath and lower your face into the water.
3. Blow a slow, steady stream from your nose and mouth until your lungs empty.
4. Lift your face just enough for one quick breath, then repeat.
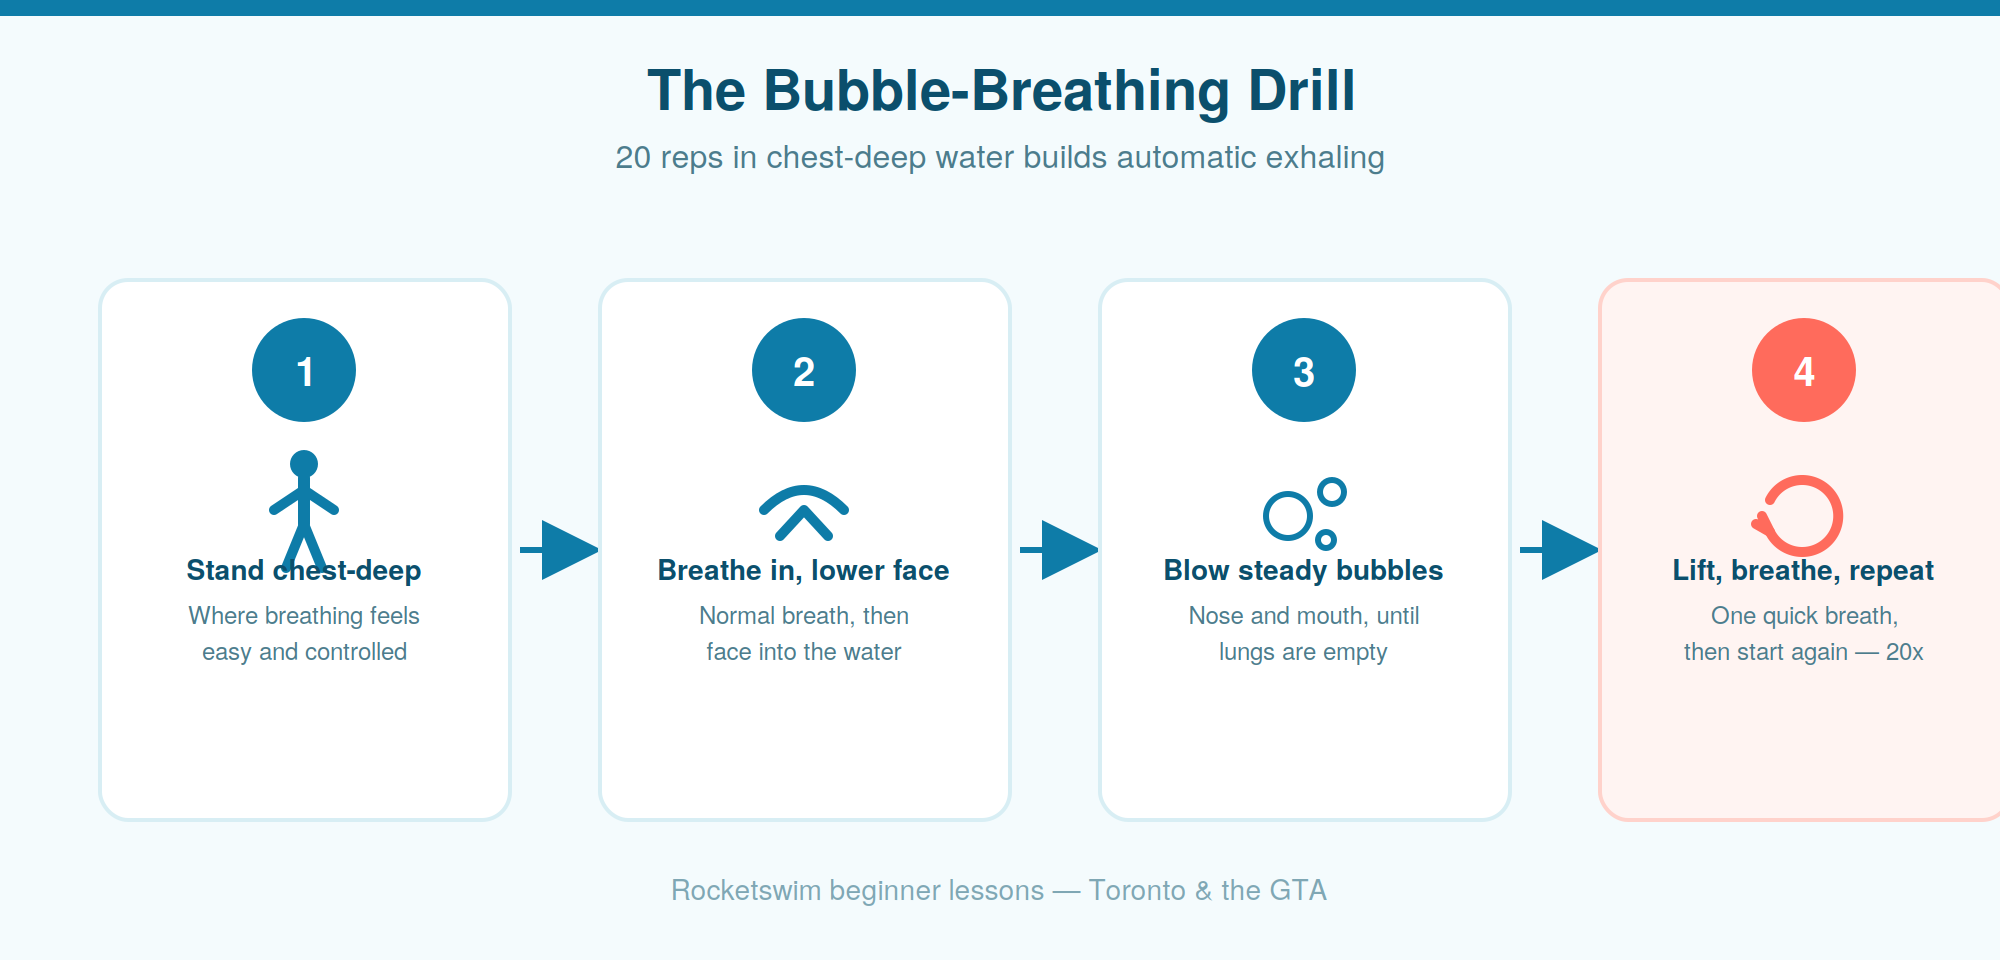
Do 20 reps in a row. Rest whenever you want to.
How do you kick correctly as a beginner?
Your legs run the engine and hold your balance. The first kick you learn is the flutter kick: a steady, alternating up-and-down kick with the legs nearly straight and the ankles loose.
Kick from the hip, not the knee. The movement starts at the top of the leg and stays small and fast. Point your toes gently and let your knees stay soft, bending only slightly. Bending the knee too much turns your leg into a brake and produces drag instead of speed, and it tires you out fast.
A good flutter kick barely breaks the surface. You want a light, constant boil in the water, not a splash. The same kick powers front crawl and backstroke, so this pays off in every stroke you learn later.
How do you practise the flutter kick with a kickboard?
A kickboard takes your arms out of the equation so you can feel the kick on its own. Hold the board in front of you with both hands and straight arms, and stretch out flat near the surface with your face down or turned to the side to breathe.
Kick from the hips with soft knees and loose ankles. Keep the board steady rather than bobbing, and aim for a light flutter that moves you slowly forward.
How do you move your arms for your first stroke?
Your arms turn a float and a kick into a stroke. Reach forward, then pull the water back past your body, one arm at a time in a smooth alternating rhythm. Each hand enters fingertips-first and sweeps back toward your hip.
Coordination beats speed at this stage. A slow, connected stroke that links your arms to your breathing and kick will always outperform fast arms that leave you gasping. Let each arm finish its pull before the other starts.
Front crawl alternates the arms continuously. Breaststroke sweeps them out and back together. Which one you learn first shapes how quickly the rest clicks.
Should beginners learn freestyle or breaststroke first?
Two reasonable answers here, and you should know both.
Standard Canadian programs teach front crawl first. The Lifesaving Society’s Swim for Life curriculum, which sits behind most learn-to-swim classes in this country, introduces flutter kick and front crawl in Swimmer 1. Breaststroke arrives in Swimmer 4, with the full stroke at Swimmer 5. The reasoning: breaststroke timing (pull, breathe, kick, glide) asks a lot of a new swimmer, and head-up breaststroke learned badly builds a high-head habit that takes months to unlearn.
We often start nervous adults on breaststroke anyway. Breaststroke keeps your head up and your eyes forward, and its breathing is simple, since you lift to breathe every stroke at your own pace without turning your face into the water. When water confidence is the thing holding someone back, that calmer entry point gets them swimming sooner, and we correct the head position as their confidence grows.
Front crawl, also called freestyle, is faster and more efficient over distance, and most swimmers end up preferring it. Its side-breathing and continuous arm turnover ask more of a beginner all at once. If you already feel settled in the water, going straight to freestyle technique is the shorter route. If you don’t, breaststroke buys you the comfort to get there. Your instructor should make that call with you rather than following a rule.
How do you put it all together for your first swim?
Your first swim stacks the five skills, one layer at a time. Start from a front float, begin a light flutter kick, and glide. Once you’re moving and comfortable, add one arm. Then the other. Breathe in the rhythm you drilled.
Add the arms one at a time rather than throwing both in at once, so nothing overwhelms your breathing. Aim for a relaxed glide-and-swim of 3 to 5 m (10 to 16 ft) on your first attempts. A full length can wait.
Rest whenever you want. Standing up, catching your breath and starting again is how beginners build distance, and nobody gets extra credit for skipping the breaks.
What swimming gear do beginners need?
Less than you’d think. A well-fitted swimsuit, goggles and a swim cap cover almost everything. A kickboard or pull buoy counts as an optional extra, and your coach will tell you one when the time comes.
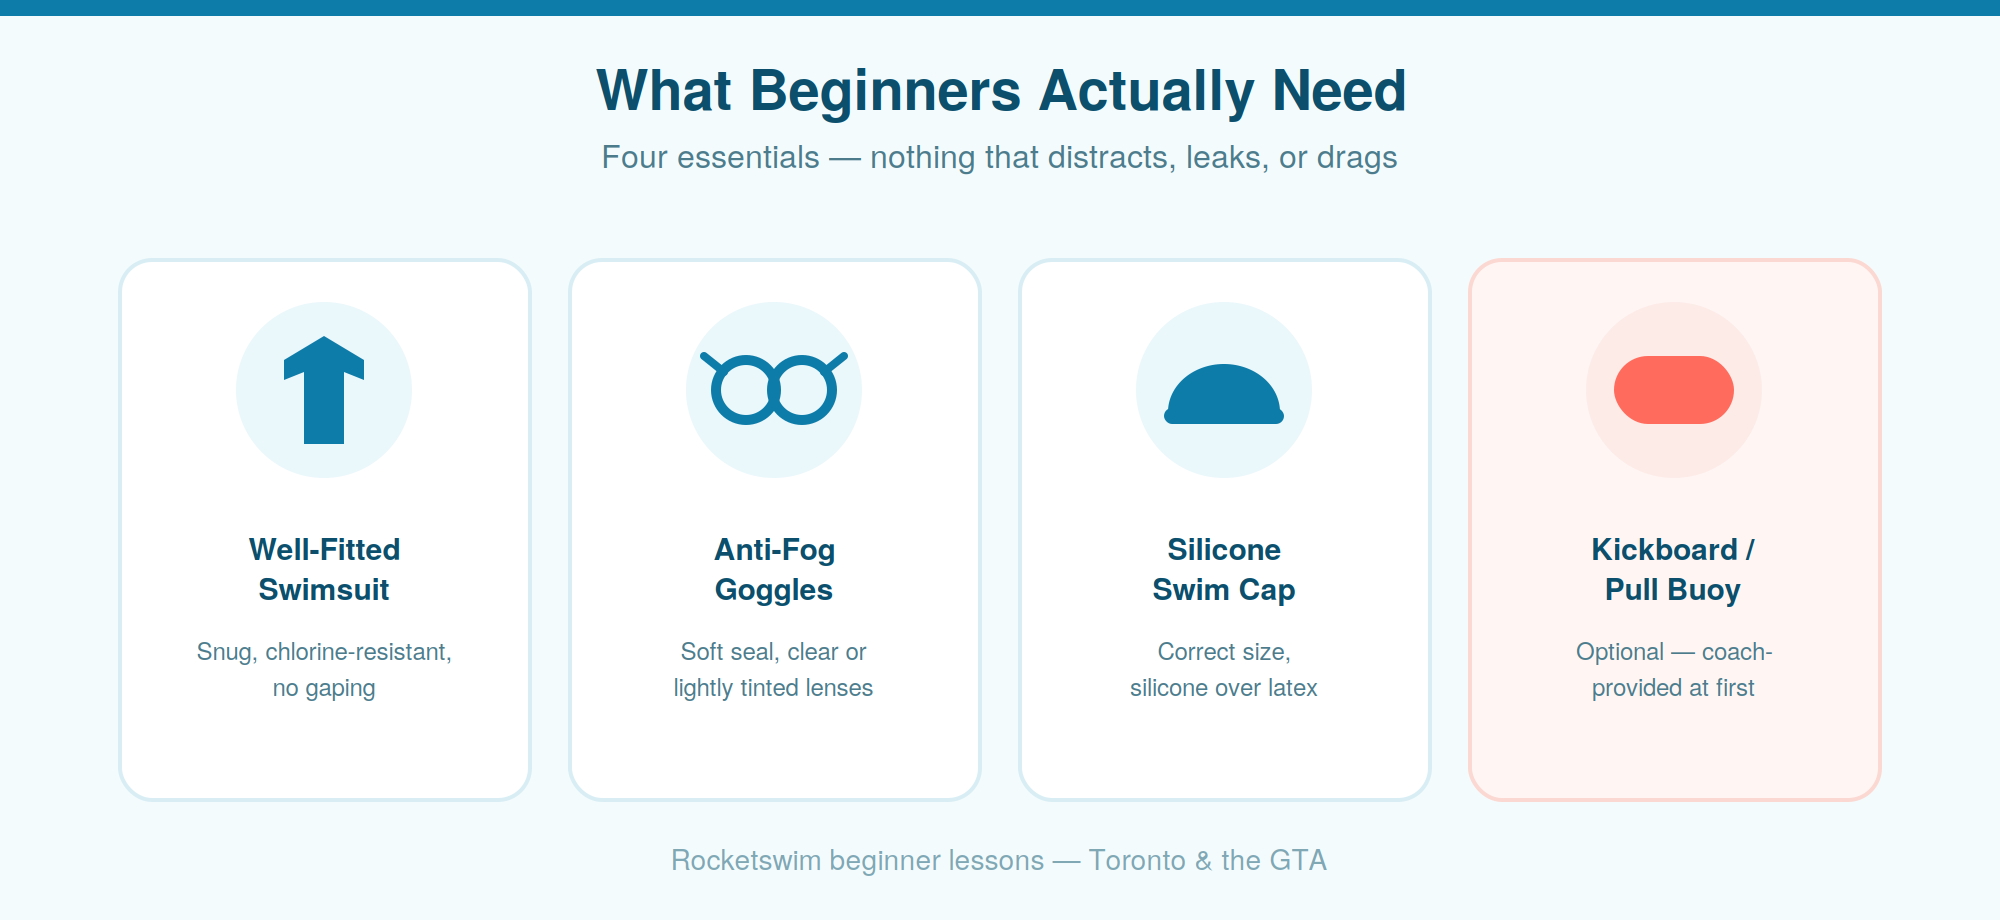
Nothing should distract you, leak, or drag.
| Gear | What to look for | Why it matters |
|---|---|---|
| Well-fitted swimsuit | Snug, chlorine-resistant, no gaping | Reduces drag and stays put while you move |
| Anti-fog goggles | Soft seal, clear or lightly tinted lenses | Lets you see and relax with your face in the water |
| Silicone swim cap | Correct size. Silicone lasts longer than latex and pulls on hair less | Keeps hair back and tidies your head position |
| Kickboard or pull buoy | Coach can help you choose | Isolates legs or arms during drills. Optional |
Skip the expensive brands. A comfortable suit and a fog-free pair of goggles will carry you through months of lessons. You can book beginner swimming lessons in Toronto and turn up with a suit, goggles and a cap.
How long does it take to learn to swim?
No national body publishes a benchmark for this, and the numbers you’ll find online range from 8 sessions to 20 or more. What we can give you is what we see in our own Toronto programs:
● Adults swim a relaxed 25 m (about 82 ft) within 8 to 16 lessons.
● Children reach basic water confidence in roughly 6 to 12 lessons.
● Most adults put their face in deep water comfortably by lesson 4 to 6.
Those ranges assume two sessions a week, which is our recommended minimum. Three works better. At one session a week, expect the same number of lessons spread over a longer calendar.
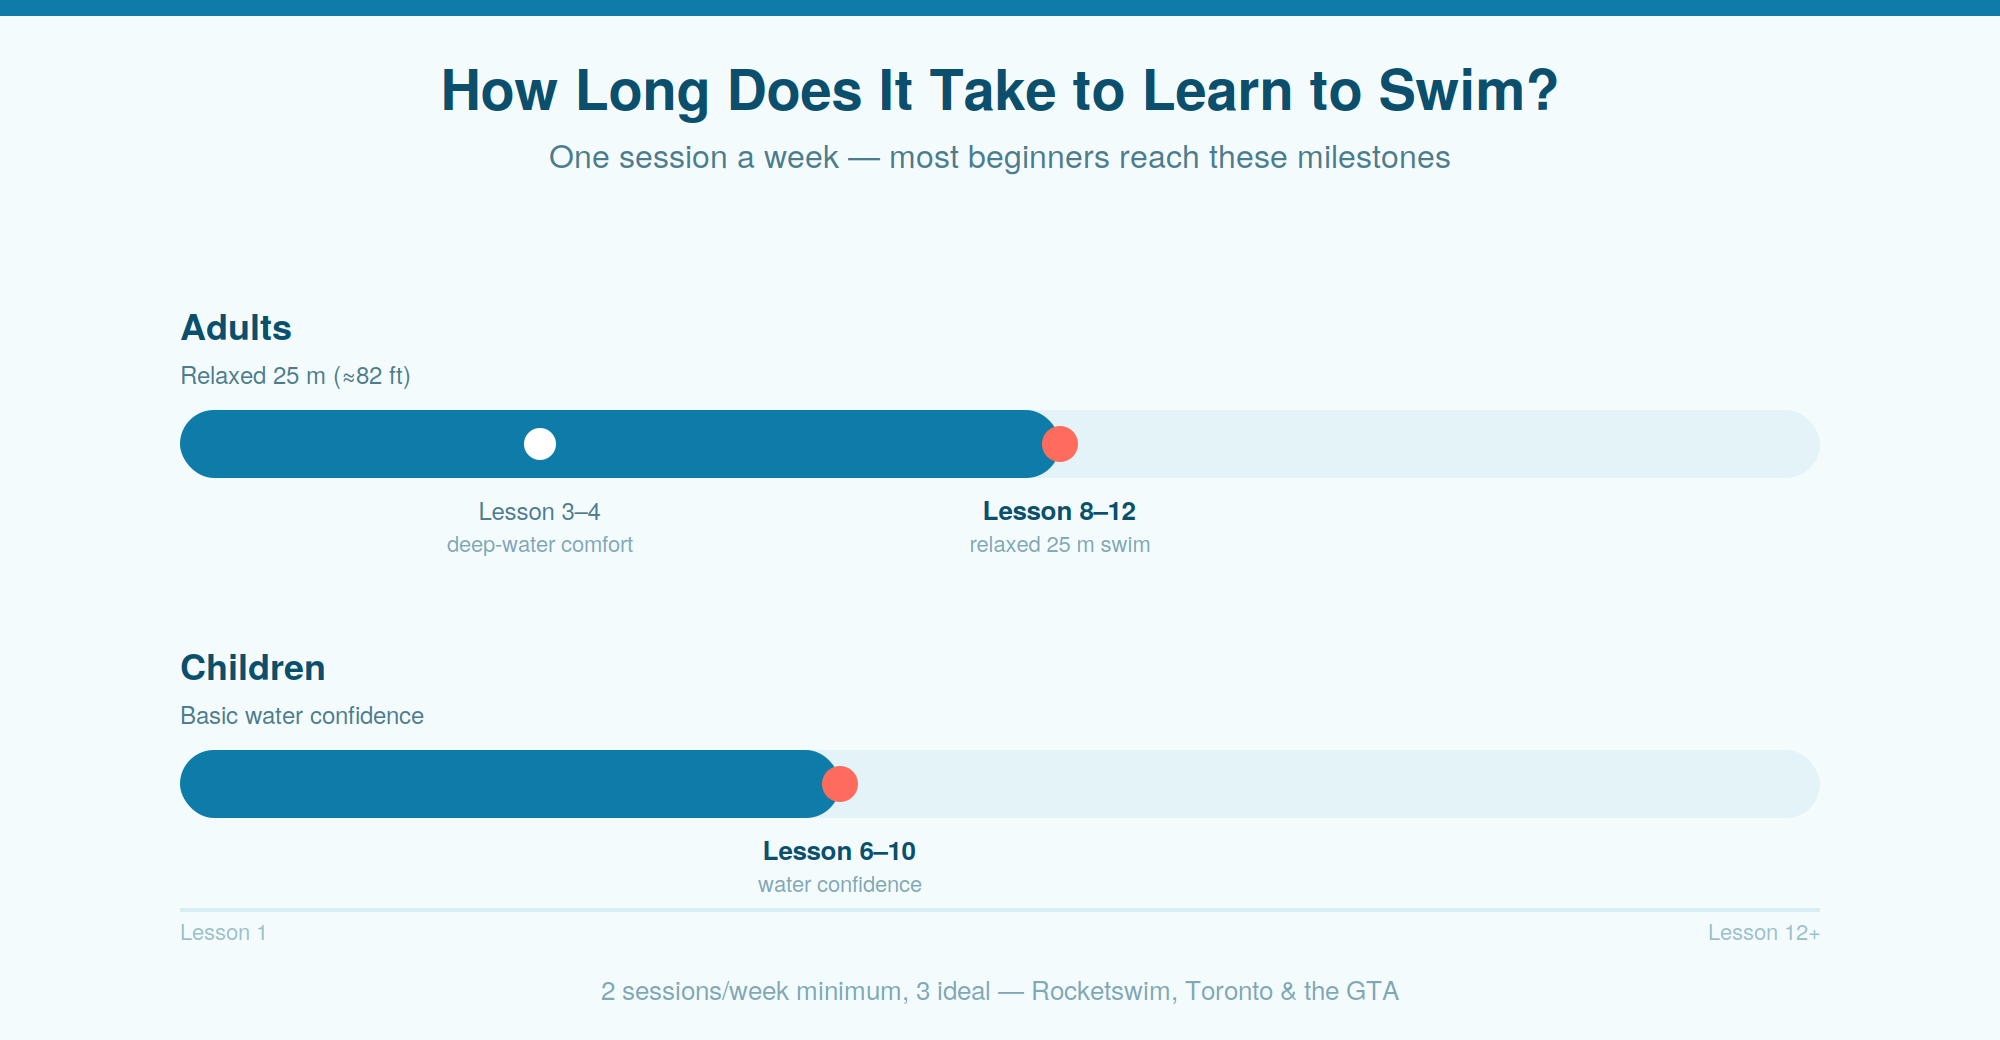
Three things move your number more than anything else:
● How often you practise. Twice a week beats once, every time.
● How relaxed you feel. Confidence in the water speeds up the rest.
● Lesson quality. Coached sessions build skills faster than solo trial and error.
Adults worry about having left it too late. They haven’t. Our adult swimming lessons regularly take complete beginners in their forties, fifties and sixties to a confident length. For younger swimmers, our kids’ learn-to-swim program moves children from a first splash to real water confidence in a matter of weeks.
What mistakes do beginners make, and how do you fix them?
After thousands of Toronto lessons, we see the same five problems slow people down.
- Holding the head too high. Lifting your head to breathe drops your hips and legs, and you plough through the water instead of moving over it. Fix: keep your head low and in line with your spine, and let the water hold it up.
- Holding your breath. Trapped air leaves no room to inhale, and panic follows. Fix: exhale steadily underwater so you surface empty and ready.
- Bent-knee kicks. Kicking from the knee creates drag and burns your legs out. Fix: kick from the hip with soft knees and loose ankles.
- Short, choppy arm strokes. Rushed, half-finished pulls waste energy and break your rhythm. Fix: reach fully forward and pull past your hip.
- Skipping the legs. Let your legs sink and your arms end up doing all the work. Fix: keep a light, constant flutter kick going throughout.
Fix these five and your swimming gets smoother and far less tiring.
Water safety for new swimmers in the GTA
Knowing how to stay safe in the water ranks alongside knowing how to swim, and weak swimming ability sits among the leading risk factors for drowning. The Lifesaving Society’s Ontario data shows where people get into trouble:
- Roughly 177 water-related deaths a year in Ontario (2017 to 2021 average), the heaviest provincial burden in Canada.
- 86% to 89% of adult victims were alone. Among adults aged 35 to 64, 89% were by themselves. Among young adults aged 15 to 34, 86%.
- 1% of drownings happen in a lifeguard-supervised setting. Where you choose to swim changes your risk more than almost anything else you control.
- Most drownings occur within 3 to 15 metres of safety, meaning a dock, a shoreline or a pool edge the person could almost reach.
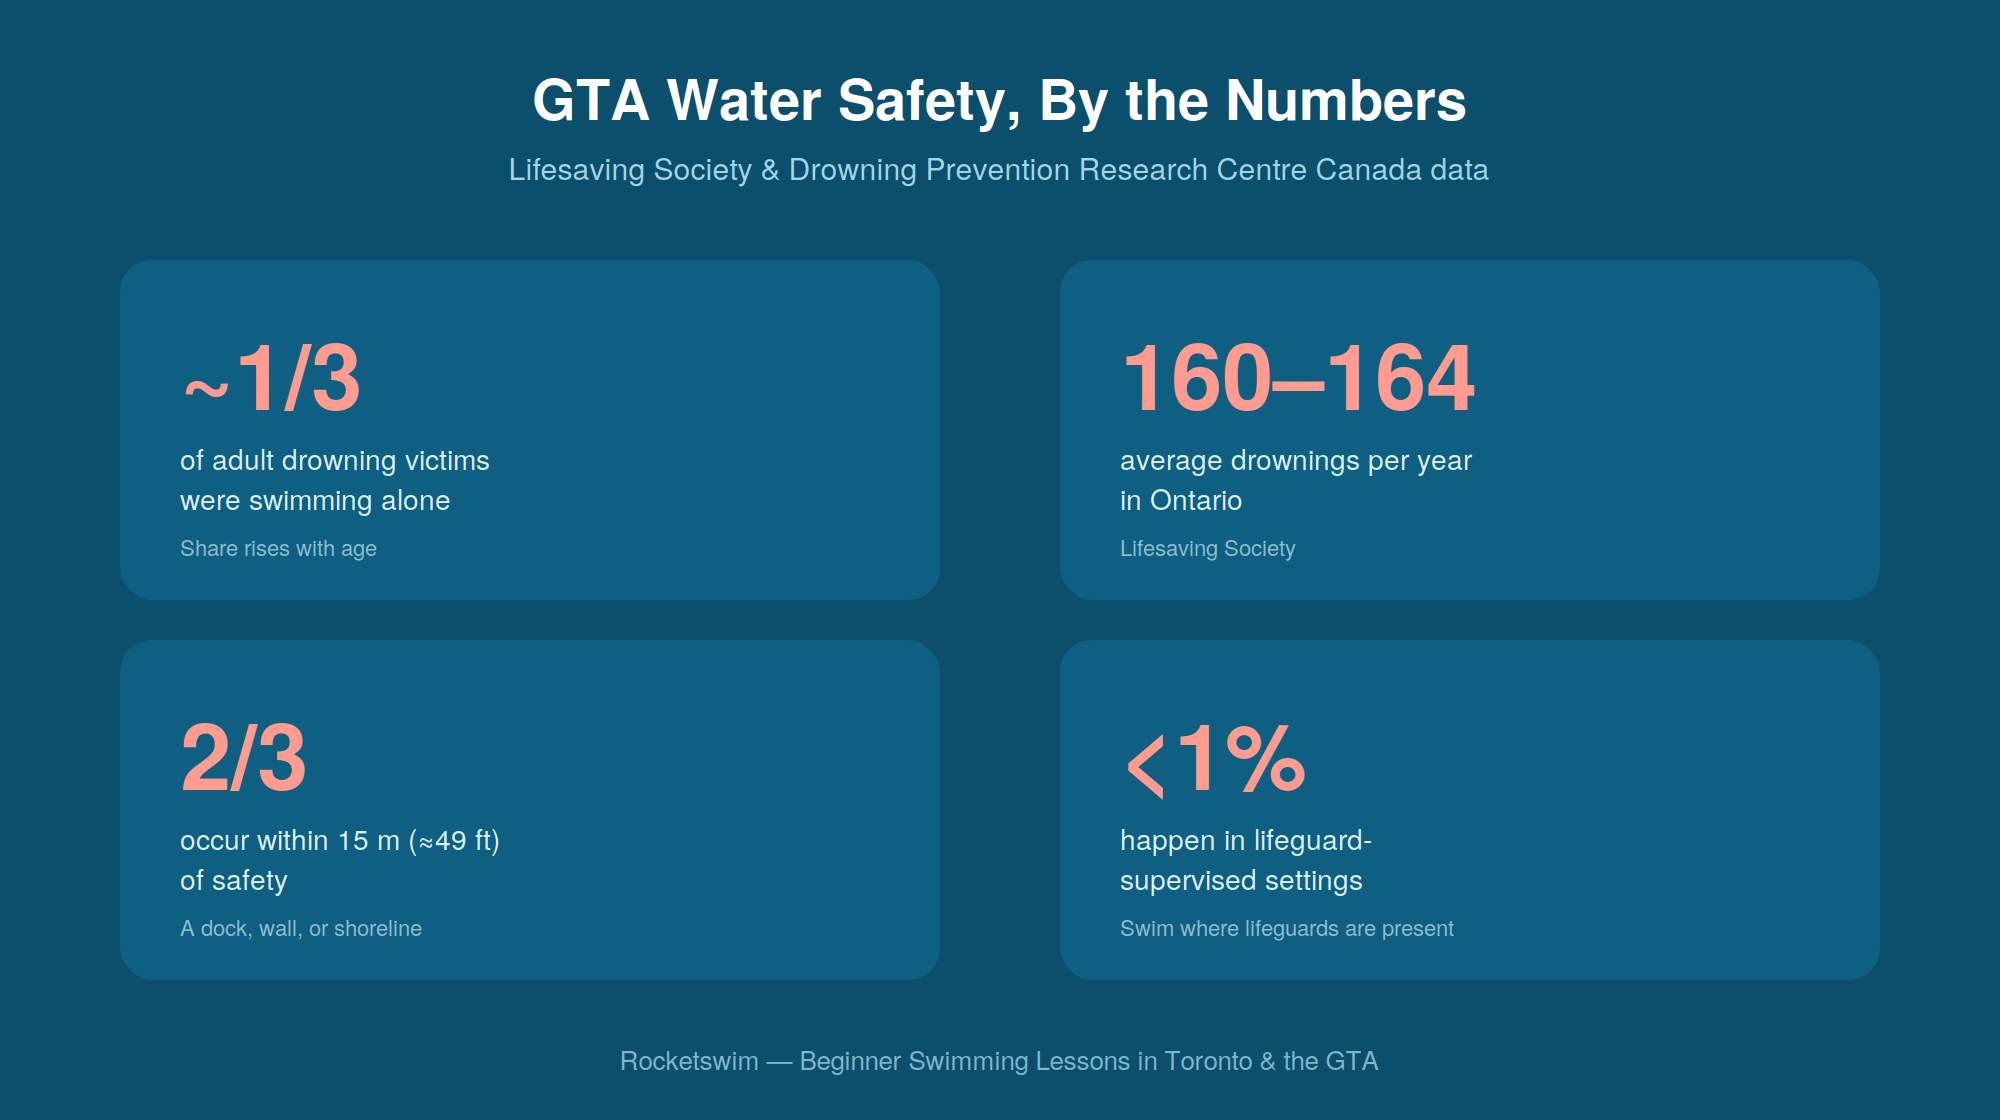
Put those four together and a pattern shows up. People drown close to safety, away from lifeguards, with nobody beside them. Ontario’s Swim to Survive program, run by the Lifesaving Society, teaches the three skills that answer it: roll into deep water, tread water for one minute, and swim 50 metres to safety.
So two rules matter more than the rest for a new swimmer. Swim where lifeguards are on duty, and don’t swim alone. Learn the Swim to Survive standard and the basics of GTA water safety before you swim anywhere unsupervised, and stay inside the distance you can comfortably swim back from.
This is general water-safety information and not medical advice. Always learn and practise under qualified supervision.
Learning to swim when you’re afraid of the water
You can learn to swim while you’re afraid of the water. Nervousness is common among adult beginners, and for most people it eases with patient, graded exposure somewhere they feel in control.
Forcing yourself into the deep end backfires. Start in shallow water and rebuild your relationship with breathing first: gentle bubbles, calm exhales, and a coach working at your pace instead of the pool’s. Every session that ends well takes a little off the fear. Rushing puts it back.
Many nervous swimmers find that a patient, structured setting is what lets them relax, and getting past the fear opens up the reasons people swim in the first place, from better sleep to the physical and mental health benefits of swimming.
If your fear runs deeper, causing panic, physical symptoms, or avoidance that affects your life, raise it with a doctor or therapist alongside lessons. A genuine phobia responds well to professional treatment, and a swim coach is no substitute for that. For everyday nerves, our coaches specialise in helping adults get past a fear of water one calm step at a time.
Swimming lessons in Toronto vs teaching yourself
You can teach yourself to swim. It takes longer, carries more risk, and it tends to bake in habits (a high head, a bent-knee kick, a held breath) that you later have to unlearn. A coach sees what you can’t feel from inside the water and fixes it before it sets. Lessons buy you feedback and a trained set of eyes on you while you practise, which matters more than pool access.
At Rocket Swim we teach beginners across Toronto and the GTA in small groups, so you get close attention without paying for one-to-one coaching. Our SPORTECOS progression runs from your first comfortable breath in the shallow end through floating, breathing, kicking and your first strokes, in the same order this guide follows. To see how the levels build and where a complete beginner starts, read how Rocket Swim’s SPORTECOS levels work.
Beginner swimming FAQs
Can adults learn to swim?
Yes. Adults learn to swim all the time. In our Toronto programs, most reach a confident length within 8 to 16 lessons at two sessions a week.
Is it too late to learn to swim at 40, 50 or 60?
No. We regularly teach complete beginners in their forties, fifties and sixties to swim comfortably.
What is the easiest stroke to learn first?
It depends on you. Standard Canadian curricula introduce front crawl first. For nervous adult beginners we often start with breaststroke, because it keeps your head up and its breathing stays simple. Your instructor should choose based on how comfortable you feel in the water.
Do you need to know how to swim before lessons?
No. Beginner lessons assume you are starting from zero, and no prior ability is expected.
How often should a beginner swim?
Two to three times a week works best. Twice weekly is the practical minimum for steady progress.
Can I practise these drills on my own? Only in a lifeguarded pool, and preferably not alone. In Ontario, 86% to 89% of adult drowning victims were by themselves, and 1% of drownings happen where a lifeguard is on duty.